Axios 原理及源码解析
一、Axios 总流程

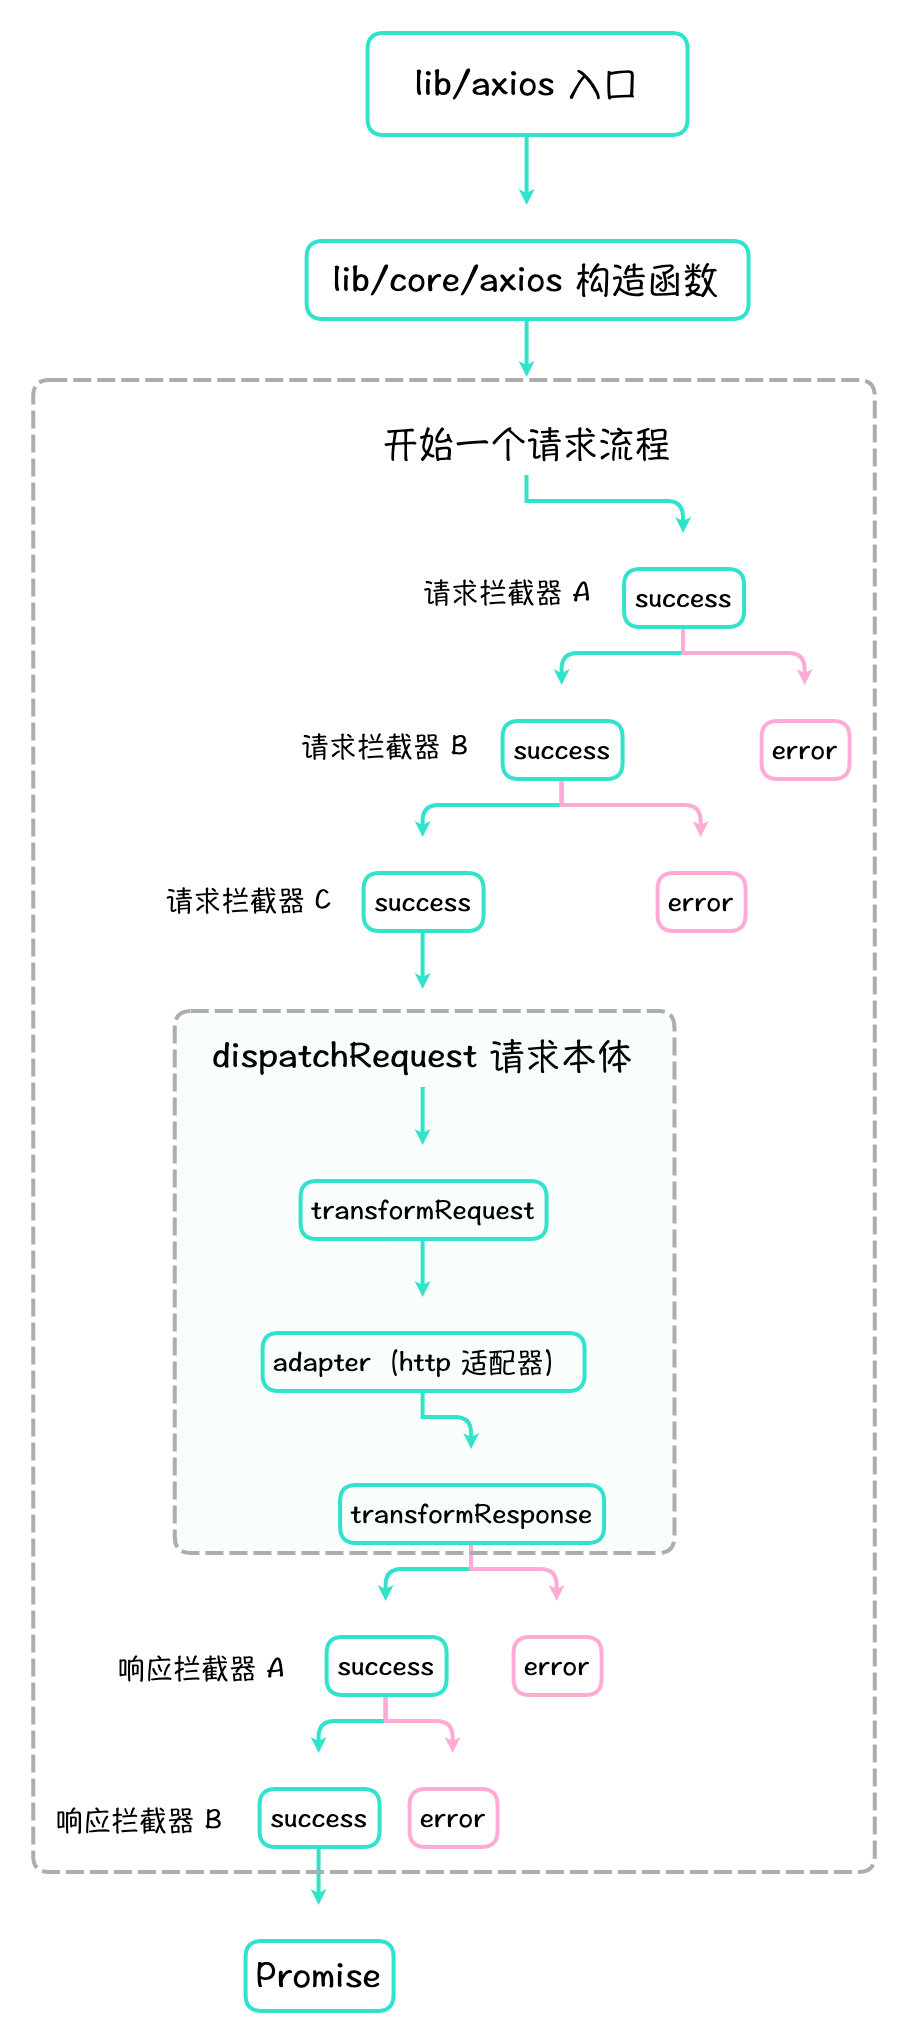
Axios 的流程是调用 Axios.prototype.request 方法,在 dispatchRequest 请求派发前依次执行请求拦截器,在派发时对 config 配置进行转换处理,然后 http 请求适配器根据处理后的配置发起请求,在响应后依次执行响应拦截器,最终返回 promise。
二、Axios 的构成
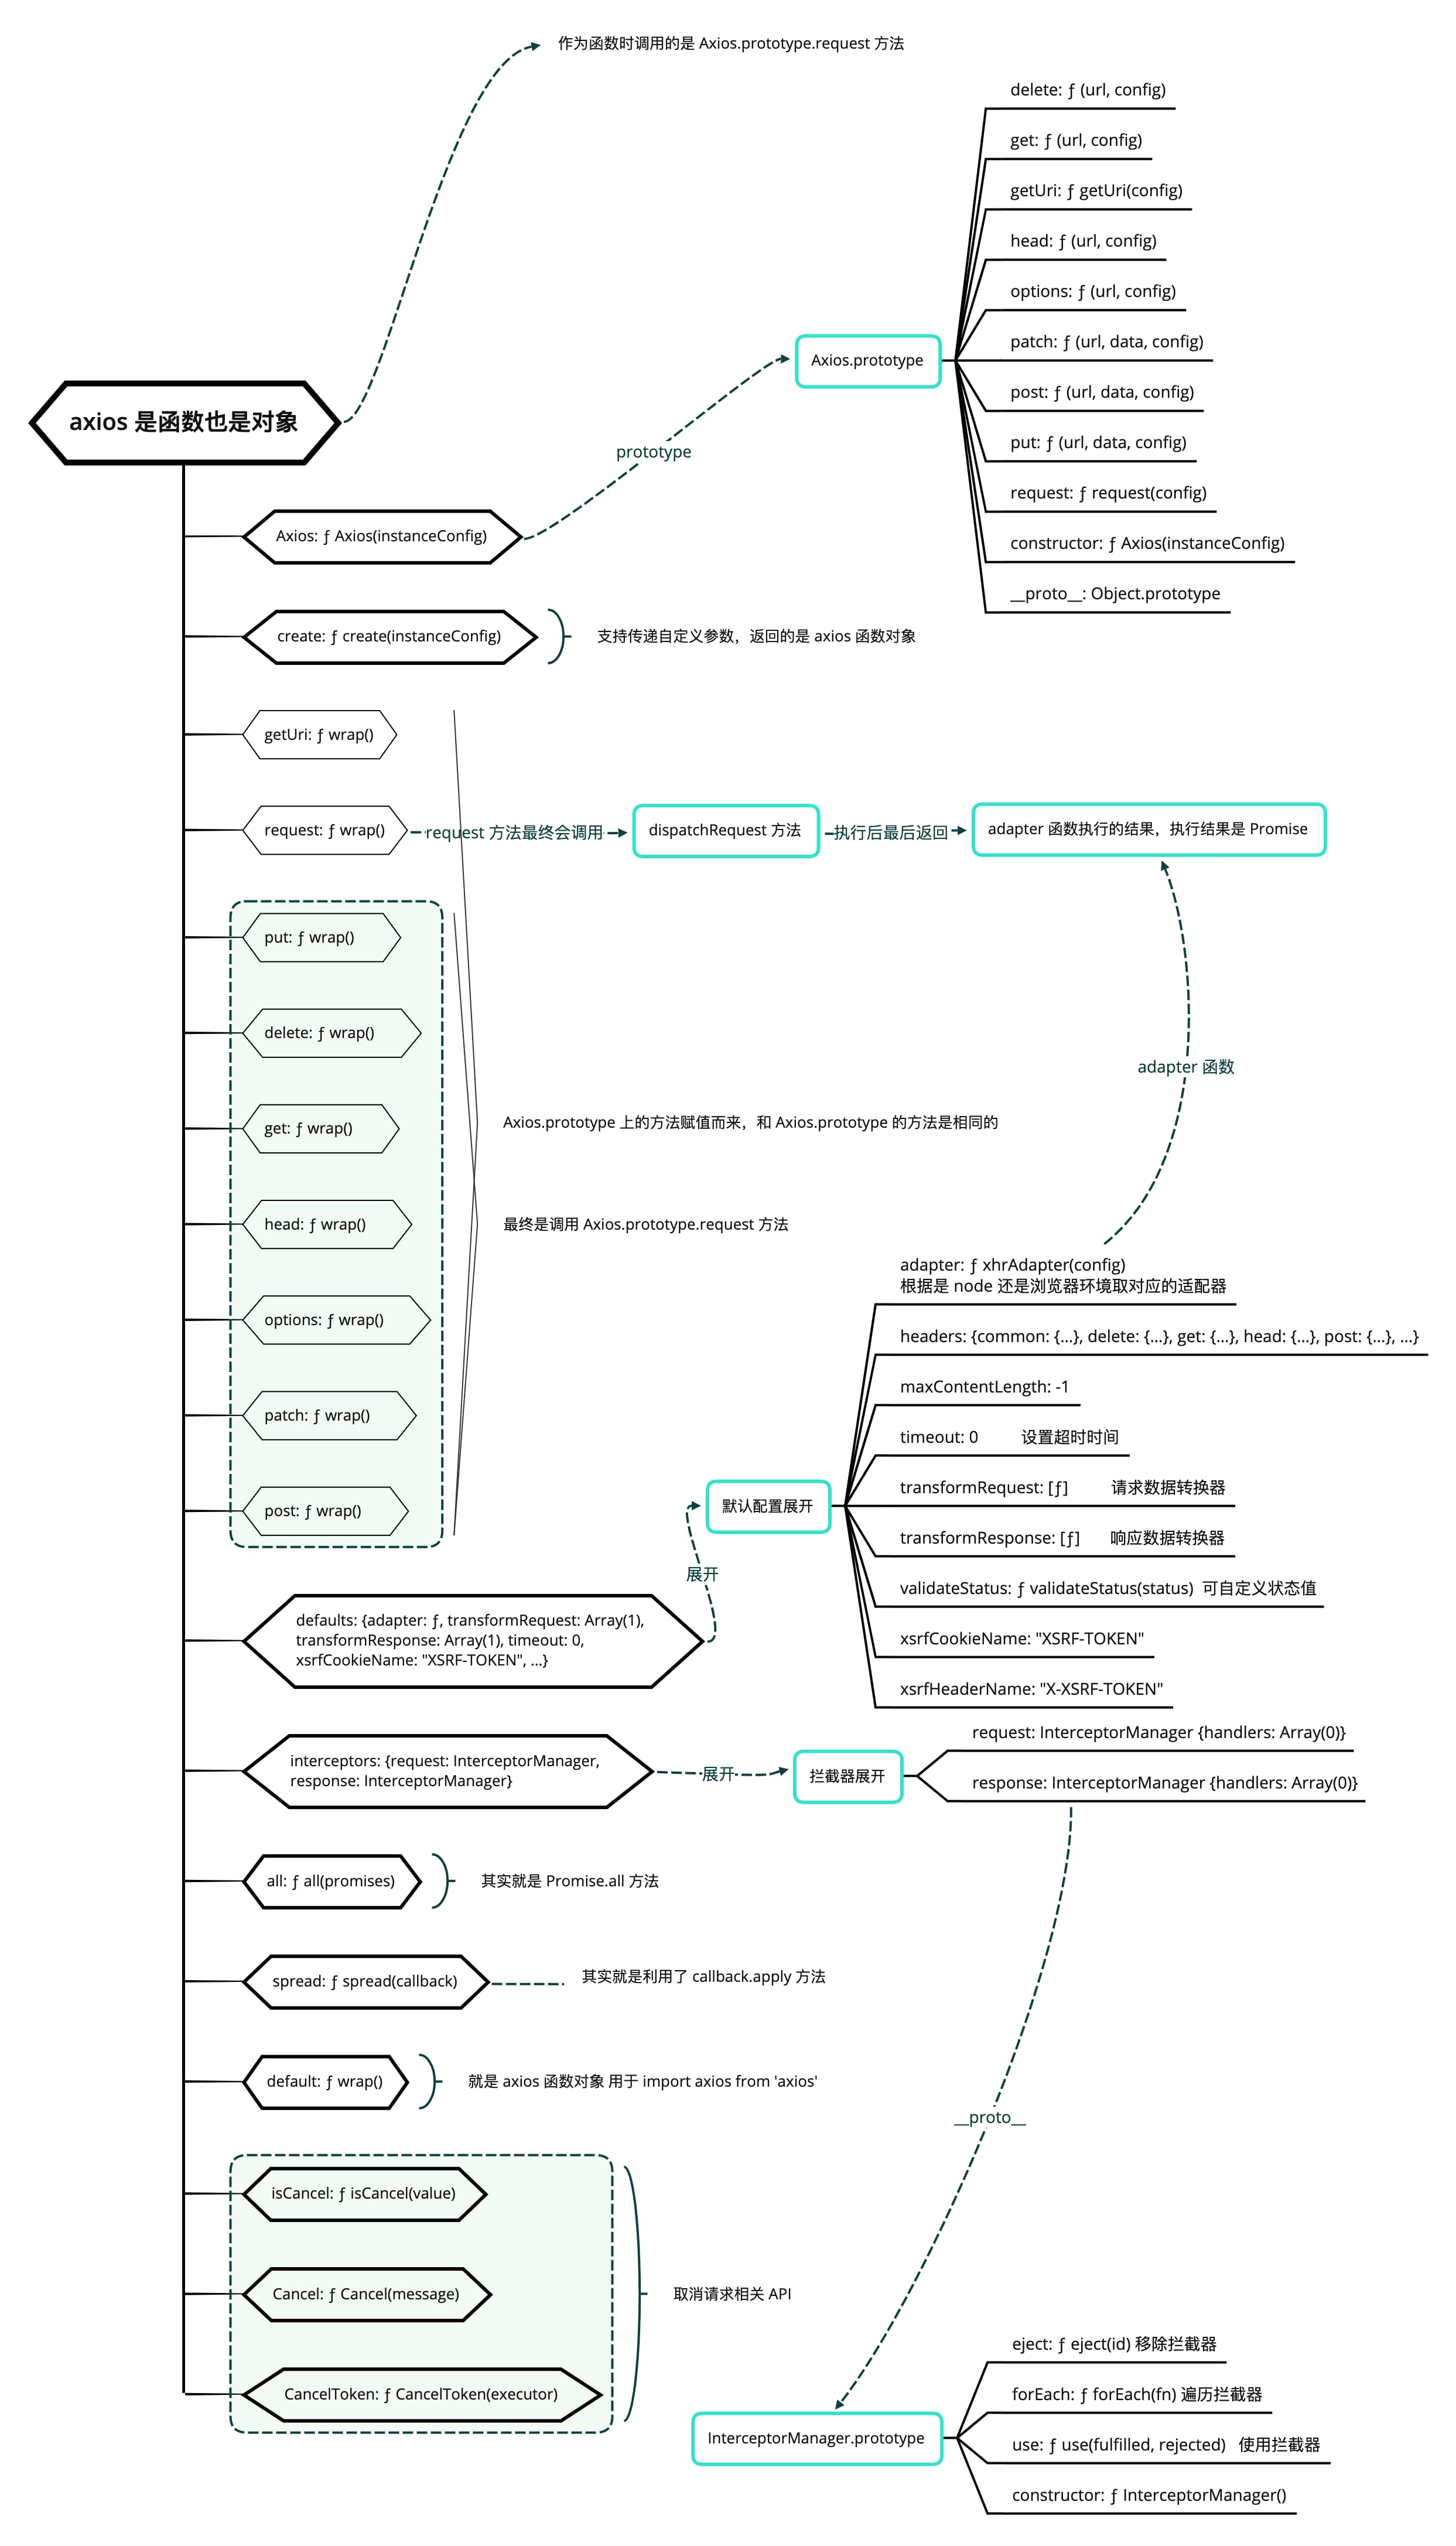
Axios 打印结果如下:
console.log({axios: axios})
Axios 的结构如下:

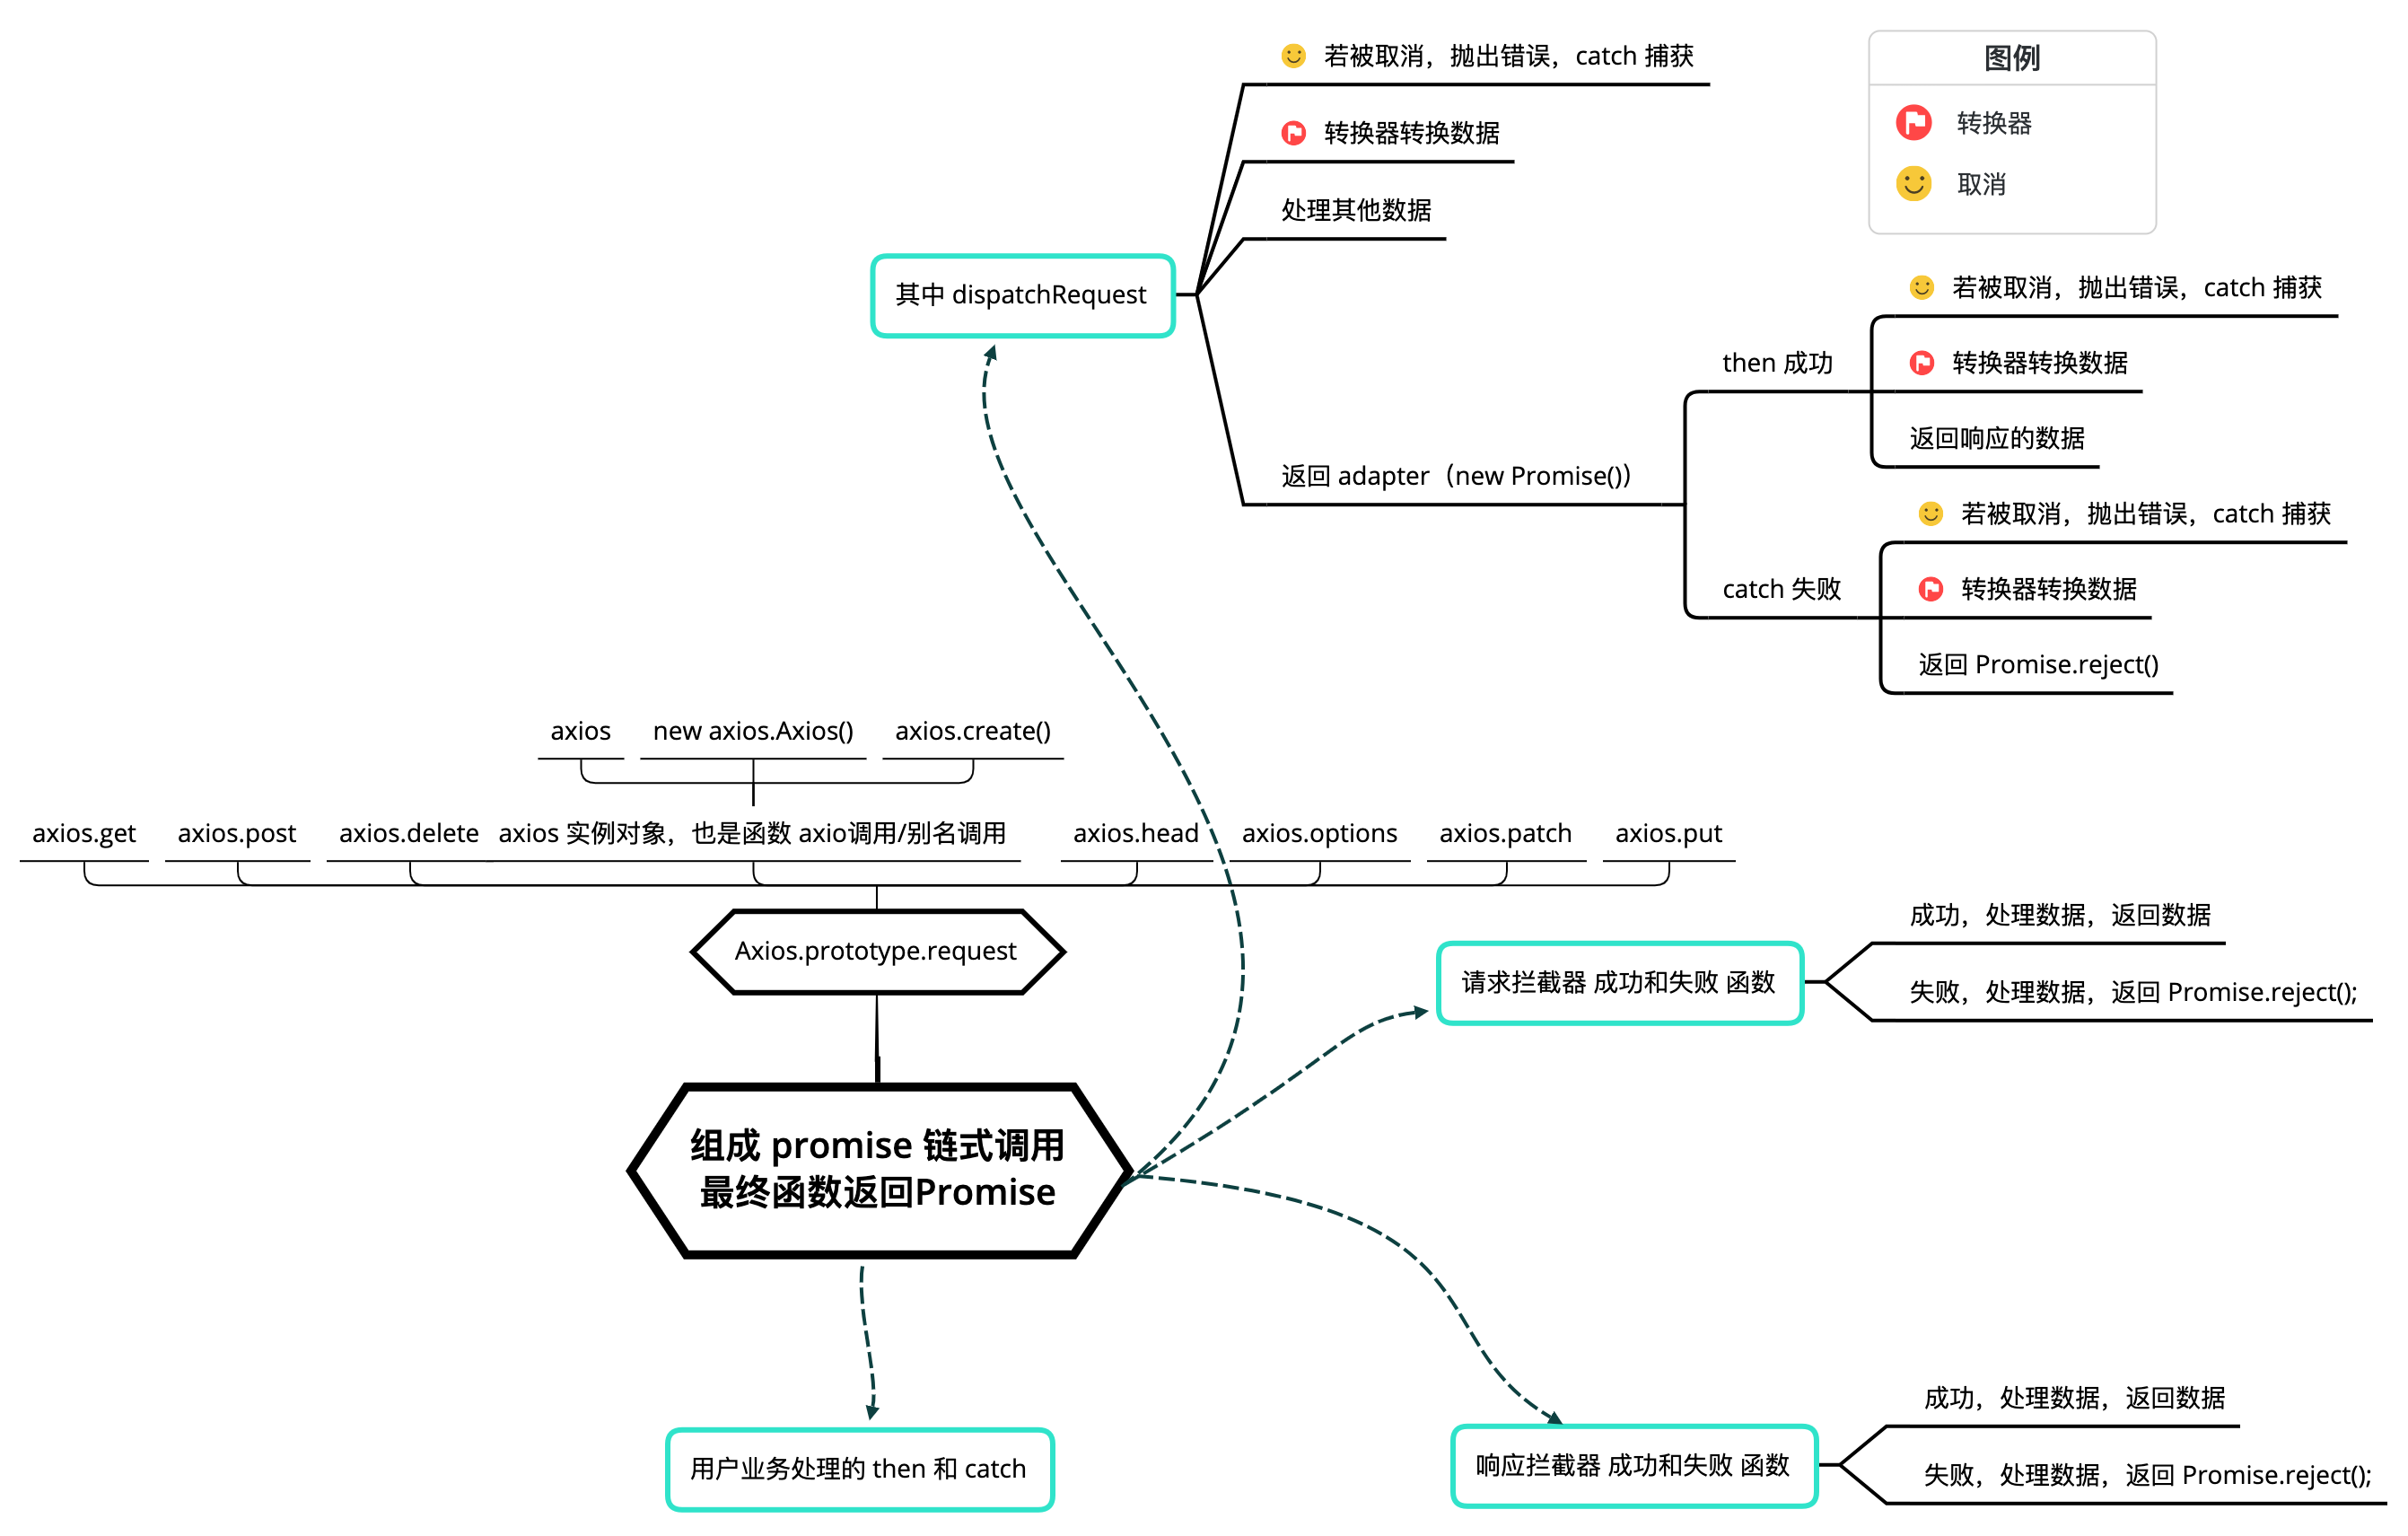
Axios 的核心是 request 方法,Axios 外部方法其实都是在调用这一个方法;方法内部创建一个 Promise 链式调用,常用的拦截器、数据修改器、http 请求等就是在这个 Promise 链式调用中逐步被执行。
三、Axios 源码解析
1、目录结构
Axios 源码目录结构如下:
📁 lib
|——  📁 adapters                    // 定义发送请求的适配器 xhr、http
|——  |——  📜 http.js                // node 端使用的请求函数,实现 http 适配器
|——  |——  📜 xhr.js                 // 浏览器端使用的请求函数,实现 xhr 适配器
|——  📁 cancel                      // 定义取消功能
|——  |——  📜 Cancel.js              // 定义了取消请求返回的信息结构
|——  |——  📜 CancelToken.js         // 定义了用于取消请求的主要方法
|——  |——  📜 isCancel.js            // 判断是否是取消请求的信息
|——  📁 core                        // 核心功能
|——  |——  📜 Axios.js               // Axios 构造函数,定义 request 方法
|——  |——  📜 dispatchRequest.js     // 用来调用 http 请求适配器方法,发送请求
|——  |——  📜 InterceptorManager.js  // InterceptorManager 类,拦截器管理器
|——  |——  📜 mergeConfig.js         // 合并参数配置项
|——  |——  📜 settle.js              // 根据 http 响应状态改变 Promise 的状态
|——  |——  📜 createError.js         // 生成指定的 error,抛出错误
|——  |——  📜 enhanceError.js        // 指定 error 对象的 toJSON 方法
|——  |——  📜 transformData.js       // 对响应以及请求进行格式化,改变数据格式
|——  📁 helpers                     // 一些独立的辅助工具方法
|——  |——  📜 ...
|——  📜 axios.js                    // 对外入口
|——  📜 defaults.js                 // Axios 默认配置
|——  📜 utils.js                    // 公共工具方法
Axios 在默认配置中根据环境判断是浏览器还是 node 环境,如果是浏览器环境则使用 xhr 适配器,如果是 node 环境则使用 http 适配器,因此既支持浏览器中发送请求也支持 node 发送请求。
2、入口文件 lib/axios.js
Axios 入口通过 createInstance 创建出的实例和 axios.create() 创建出的实例一样。createInstance 流程大致为:
- 使用 Axios 函数创建上下文 context,包含自己的
defaults、config、管理拦截器的数组; - 利用
Axios.prototype.request和上下文创建实例 instance,实例为一个 request 发送请求的函数 this 指向上下文 context; - 绑定
Axios.prototype的其他方法到 instance 实例,this 指向上下文 context; - 把上下文 context 中的
defaults和拦截器绑定到 instance 实例。
// https://github.com/axios/axios/blob/v1.x/lib/axios.js
'use strict';

import utils from './utils.js'; // 引入 utils 对象,有很多工具方法
import bind from './helpers/bind.js';
import Axios from './core/Axios.js';  // 核心构造函数 Axios
import mergeConfig from './core/mergeConfig.js';  // 合并配置方法
import defaults from './defaults/index.js'; // 引入默认配置
import formDataToJSON from './helpers/formDataToJSON.js';
import CanceledError from './cancel/CanceledError.js';
import CancelToken from './cancel/CancelToken.js';
import isCancel from './cancel/isCancel.js';
import {VERSION} from './env/data.js';
import toFormData from './helpers/toFormData.js';
import AxiosError from './core/AxiosError.js';
import spread from './helpers/spread.js';
import isAxiosError from './helpers/isAxiosError.js';
import AxiosHeaders from "./core/AxiosHeaders.js";

// 创建 axios 实例
function createInstance(defaultConfig) {
  // 实例化 Axios 对象
  const context = new Axios(defaultConfig);
  // 使实例指向 Axios.prototype.request 方法,上下文指向 context
  // 也是调用 axios 即调用 Axios.prototype.request 函数的原因
  const instance = bind(Axios.prototype.request, context);

  // 复制 Axios.prototype、context 上的属性到实例上
  // 也是为什么有 axios.get 等方法、defaults、interceptors 属性的原因
  utils.extend(instance, Axios.prototype, context, {allOwnKeys: true});
  utils.extend(instance, context, null, {allOwnKeys: true});

  // 工厂模式,可以根据自定义参数创建新的实例
  instance.create = function create(instanceConfig) {
    return createInstance(mergeConfig(defaultConfig, instanceConfig));
  };

  // 最后返回实例对象
  return instance;
}

// 导出创建的默认实例
const axios = createInstance(defaults);

// 暴露 Axios class 以允许 class 继承,也就是兼容 new axios.Axios() 的用法
axios.Axios = Axios;

// 导出 Cancel 和 CancelToken
axios.CanceledError = CanceledError;
axios.CancelToken = CancelToken;
axios.isCancel = isCancel;
axios.VERSION = VERSION;
axios.toFormData = toFormData;

// Expose AxiosError class
axios.AxiosError = AxiosError;

// alias for CanceledError for backward compatibility
axios.Cancel = axios.CanceledError;

// 导出 all 和 spread API
axios.all = function all(promises) {
  return Promise.all(promises);
};

axios.spread = spread;

// Expose isAxiosError
axios.isAxiosError = isAxiosError;

axios.AxiosHeaders = AxiosHeaders;

axios.formToJSON = thing => formDataToJSON(utils.isHTMLForm(thing) ? new FormData(thing) : thing);

axios.default = axios;

// this module should only have a default export
export default axios
3、核心构造函数 lib/core/Axios.js
流程如下:

lib/core/Axios.js 中定义了 Axios 实例上的 request、get、post、delete 方法。get、post、delete 等方法均是基于 Axios.prototype.request 的封装。
在 Axios.prototype.request 中会依次执行请求拦截器、dispatchRequest(实际发起)、响应拦截器。
- lib/core/Axios.js
- InterceptorManager 拦截器
- request 请求核心方法
- dispatchRequest 派发请求
// https://github.com/axios/axios/blob/v1.x/lib/core/Axios.js
'use strict';

import utils from './../utils.js';
import buildURL from '../helpers/buildURL.js';
import InterceptorManager from './InterceptorManager.js';
import dispatchRequest from './dispatchRequest.js';
import mergeConfig from './mergeConfig.js';
import buildFullPath from './buildFullPath.js';
import validator from '../helpers/validator.js';
import AxiosHeaders from './AxiosHeaders.js';

const validators = validator.validators;

/**
 * Create a new instance of Axios
 *
 * @param {Object} instanceConfig The default config for the instance
 *
 * @return {Axios} A new instance of Axios
 */
class Axios {
  constructor(instanceConfig) {
    // 默认参数
    this.defaults = instanceConfig;
    // 拦截器 请求和响应拦截器,详情见 Tab2
    this.interceptors = {
      request: new InterceptorManager(),
      response: new InterceptorManager()
    };
  }

  /**
   * Dispatch a request
   *
   * @param {String|Object} configOrUrl The config specific for this request (merged with this.defaults)
   * @param {?Object} config
   *
   * @returns {Promise} The Promise to be fulfilled
   */
  request(configOrUrl, config) {
    // ... 核心方法,详情见 Tab3
    return promise;
  }

  // 获取 Uri 的函数
  getUri(config) {
    config = mergeConfig(this.defaults, config);
    const fullPath = buildFullPath(config.baseURL, config.url);
    return buildURL(fullPath, config.params, config.paramsSerializer);
  }
}

// 基于 Axios.prototype.request 封装其他方法
// 将 delete、get、head、options、post、put、patch 添加到 Axios.prototype的 原型链上
// 例如 Axios.prototype.delete = ...
// 就是为什么可以 axios.get 等别名的方式调用
utils.forEach(['delete', 'get', 'head', 'options'], function forEachMethodNoData(method) {
  Axios.prototype[method] = function(url, config) {
    return this.request(mergeConfig(config || {}, {
      method,
      url,
      data: (config || {}).data
    }));
  };
});

utils.forEach(['post', 'put', 'patch'], function forEachMethodWithData(method) {
  /*eslint func-names:0*/

  function generateHTTPMethod(isForm) {
    return function httpMethod(url, data, config) {
      return this.request(mergeConfig(config || {}, {
        method,
        headers: isForm ? {
          'Content-Type': 'multipart/form-data'
        } : {},
        url,
        data
      }));
    };
  }

  Axios.prototype[method] = generateHTTPMethod();

  Axios.prototype[method + 'Form'] = generateHTTPMethod(true);
});

export default Axios;
Axios 拦截器的原理:
在 InterceptorManager 中定义了 axios 拦截器类,用来实现拦截器,通过 use 方法添加请求和响应拦截器,在 Axios.prototype.request 函数组成 promise 链式调用时,通过定义的 forEach 方法在 dispatchRequest 请求本地前后遍历执行,实现请求前拦截和响应后拦截,另外还通过 eject 方法根据 use 返回的 id 来移除拦截器。
// https://github.com/axios/axios/blob/v1.x/lib/core/InterceptorManager.js
'use strict';

import utils from './../utils.js';

// 拦截器类
class InterceptorManager {
  constructor() {
    // handlers 数组用来存储拦截器
    this.handlers = [];
  }

  // 添加拦截器
  use(fulfilled, rejected, options) {
    this.handlers.push({
      fulfilled,  // 成功的回调
      rejected,   // 失败的回调
      synchronous: options ? options.synchronous : false,
      runWhen: options ? options.runWhen : null
    });
    // 返回 ID 用于 eject 移除
    return this.handlers.length - 1;
  }

  // 根据 use 返回的 ID 移除拦截器,返回 true 时表示移除成功
  eject(id) {
    if (this.handlers[id]) {
      this.handlers[id] = null;
    }
  }

  // 移除所有拦截器
  clear() {
    if (this.handlers) {
      this.handlers = [];
    }
  }

  // 遍历执行所有拦截器,传递一个回调函数(每一个拦截器函数作为参数)调用
  // 被移除的一项是 null,所以不会执行,也就达到了移除的效果
  forEach(fn) {
    utils.forEach(this.handlers, function forEachHandler(h) {
      if (h !== null) {
        fn(h);
      }
    });
  }
}

export default InterceptorManager;
主要做了以下事情:
- 判断第一个参数是否为字符串,是则设置 url,以支持
axios('example/url', [, config])和axios({}) - 合并默认参数和用户传递的参数;
- 设置请求的方法,默认是 get 方法;
- 将用户设置的请求和响应拦截器、发送请求的
dispatchRequest组成 Promise 链,最后返回 Promise 实例。
即保证了请求前拦截器先执行,然后发送请求,再响应拦截器执行这样的顺序。
// https://github.com/axios/axios/blob/v1.x/lib/core/Axios.js#L30

/**
 * Dispatch a request
 *
 * @param {String|Object} configOrUrl The config specific for this request (merged with this.defaults)
 * @param {?Object} config
 *
 * @returns {Promise} The Promise to be fulfilled
 */
request(configOrUrl, config) {
  // 如果 configOrUrl 是字符串,把字符串当作请求的 url 地址
  // 兼容 axios('example/url'[, config]) 的写法
  if (typeof configOrUrl === 'string') {
    config = config || {};
    config.url = configOrUrl;
  } else {
    config = configOrUrl || {};
  }

  // 合并默认参数和用户传递的参数
  config = mergeConfig(this.defaults, config);

  const { transitional, paramsSerializer, headers } = config;

  if (transitional !== undefined) {
    validator.assertOptions(transitional, {
      silentJSONParsing: validators.transitional(validators.boolean),
      forcedJSONParsing: validators.transitional(validators.boolean),
      clarifyTimeoutError: validators.transitional(validators.boolean)
    }, false);
  }

  if (paramsSerializer !== undefined) {
    validator.assertOptions(paramsSerializer, {
      encode: validators.function,
      serialize: validators.function
    }, true);
  }

  // 设置请求方法,默认 get
  config.method = (config.method || this.defaults.method || 'get').toLowerCase();

  let contextHeaders;

  // Flatten headers
  contextHeaders = headers && utils.merge(
    headers.common,
    headers[config.method]
  );

  contextHeaders && utils.forEach(
    ['delete', 'get', 'head', 'post', 'put', 'patch', 'common'],
    (method) => {
      delete headers[method];
    }
  );

  config.headers = AxiosHeaders.concat(contextHeaders, headers);

  /**
   * 下面是组成 Promise 链,返回 Promise 实例
   */
  // filter out skipped interceptors
  const requestInterceptorChain = [];
  let synchronousRequestInterceptors = true;
  // 遍历用户设置的请求拦截器,放到数组 requestInterceptorChain 前面
  this.interceptors.request.forEach(function unshiftRequestInterceptors(interceptor) {
    if (typeof interceptor.runWhen === 'function' && interceptor.runWhen(config) === false) {
      return;
    }

    synchronousRequestInterceptors = synchronousRequestInterceptors && interceptor.synchronous;

    requestInterceptorChain.unshift(interceptor.fulfilled, interceptor.rejected);
  });

  const responseInterceptorChain = [];
  // 遍历用户设置的响应拦截器,放到数组 responseInterceptorChain 后面
  this.interceptors.response.forEach(function pushResponseInterceptors(interceptor) {
    responseInterceptorChain.push(interceptor.fulfilled, interceptor.rejected);
  });

  // 创建 Promise 实例
  let promise;
  let i = 0;
  let len;

  // 下面是开始执行请求流程
  if (!synchronousRequestInterceptors) {
    // dispatchRequest 用于最终派发请求,详情见 Tab4
    const chain = [dispatchRequest.bind(this), undefined];
    chain.unshift.apply(chain, requestInterceptorChain);
    chain.push.apply(chain, responseInterceptorChain);
    len = chain.length;

    promise = Promise.resolve(config);

    while (i < len) {
      promise = promise.then(chain[i++], chain[i++]);
    }

    return promise;
  }

  len = requestInterceptorChain.length;

  let newConfig = config;

  i = 0;

  while (i < len) {
    const onFulfilled = requestInterceptorChain[i++];
    const onRejected = requestInterceptorChain[i++];
    try {
      newConfig = onFulfilled(newConfig);
    } catch (error) {
      onRejected.call(this, error);
      break;
    }
  }

  try {
    // dispatchRequest 用于最终派发请求,详情见 Tab4
    promise = dispatchRequest.call(this, newConfig);
  } catch (error) {
    return Promise.reject(error);
  }

  i = 0;
  len = responseInterceptorChain.length;

  while (i < len) {
    promise = promise.then(responseInterceptorChain[i++], responseInterceptorChain[i++]);
  }

  return promise;
}
主要做了以下事情:
- 如果已经取消,则 throw 原因报错,使 Promise 走向
rejected; - 对
config进行处理; - http 请求适配器根据处理后的 config 配置发起请求;
- 根据请求成功或失败返回转换后的 response 或 reject。
// https://github.com/axios/axios/blob/v1.x/lib/core/dispatchRequest.js
'use strict';

import transformData from './transformData.js';
import isCancel from '../cancel/isCancel.js';
import defaults from '../defaults/index.js';
import CanceledError from '../cancel/CanceledError.js';
import AxiosHeaders from '../core/AxiosHeaders.js';

/**
 * 判断请求是否已被取消
 * 如果取消,抛出错误原因,使 Promise 走向 rejected
 */
function throwIfCancellationRequested(config) {
  if (config.cancelToken) {
    config.cancelToken.throwIfRequested();
  }

  if (config.signal && config.signal.aborted) {
    throw new CanceledError();
  }
}

/**
 * Dispatch a request to the server using the configured adapter.
 *
 * @param {object} config The config that is to be used for the request
 *
 * @returns {Promise} The Promise to be fulfilled
 */
export default function dispatchRequest(config) {
  throwIfCancellationRequested(config);

  // 确保 headers 存在
  config.headers = AxiosHeaders.from(config.headers);

  // 转换请求的数据
  config.data = transformData.call(
    config,
    config.transformRequest
  );

  if (['post', 'put', 'patch'].indexOf(config.method) !== -1) {
    config.headers.setContentType('application/x-www-form-urlencoded', false);
  }

  // 如果 config 配置了 adapter,使用该 adapter 替代默认的请求方法
  const adapter = config.adapter || defaults.adapter;

  // 使用 adapter 适配器发起请求
  return adapter(config).then(
    // 请求正确返回的回调
    function onAdapterResolution(response) {
      // 判断是否已取消请求,如果取消了请求则抛出以取消
      throwIfCancellationRequested(config);

      // Transform response data
      response.data = transformData.call(
        config,
        config.transformResponse, // 对服务器返回的数据进行格式化
        response
      );

      response.headers = AxiosHeaders.from(response.headers);

      return response;
    },
    // 请求失败的回调
    function onAdapterRejection(reason) {
      if (!isCancel(reason)) {
        throwIfCancellationRequested(config);

        // Transform response data
        if (reason && reason.response) {
          reason.response.data = transformData.call(
            config,
            config.transformResponse,
            reason.response
          );
          reason.response.headers = AxiosHeaders.from(reason.response.headers);
        }
      }

      return Promise.reject(reason);
    }
  );
}
Axios 拦截器和链式调用结构如下(点击放大查看)

- 如果设置了多个请求响应器,后设置的先执行;
- 如果设置了多个响应拦截器,先设置的先执行。
4、多种形式调用 Axios 的原理
Axios 的调用方式有:
// 方式一
axios(config)

// 方式二
axios.request(config)

// 方式三
axios.get(url[, config])  // delete, get, head, options 同理

// 方式四
axios.post(url[, data[, config]]) // post, put, patch 同理

// 方式五
axios('example/url'[, config])
- 方式一〡二〡三〡四
- 方式五
通过上面 lib/axios.js 入口文件中以下代码实现:
function createInstance(defaultConfig) {
  // 实例化 Axios 对象
  const context = new Axios(defaultConfig);

  // 使实例指向 Axios.prototype.request 方法,上下文指向 context
  // 以兼容 axios(config) 的调用方式
  const instance = bind(Axios.prototype.request, context);

  // 复制 Axios.prototype,并绑定 this 为 context
  // 以兼容 axios.request(config) 的调用方式
  // 而 Axios.prototype.request 又定义了 get、post、option 等方法
  // 因此也就兼容了 axios.get(url[, config])
  // 也兼容了 axios.post(url[, data[, config]])
  utils.extend(instance, Axios.prototype, context, {allOwnKeys: true});

  // ...
}
通过 lib/core/Axios.js 核心构造函数文件中的核心方法 request 实现:
request(configOrUrl, config) {
  // 如果传入的第一个参数为字符串
  // 则认为是 url 字符串,并且把 url 参数添加到第二个参数 config 中
  // 以兼容 axios('example/url'[, config]) 的调用方式
  if (typeof configOrUrl === 'string') {
    config = config || {};
    config.url = configOrUrl;
  } else {
    config = configOrUrl || {};
  }
  // ...
}
可以看到,Axios 源码中使 Axios 实例对象指向 Axios.prototype.request 方法,兼容了函数调用的方式;另外还复制了 Axios.prototype 和 context 上的属性到实例对象上,兼容了 axios.request、axios.get、axios.post 的调用方式;所以 Axios 既可以当函数调用,也可以当对象使用。
5、Axios 取消请求源码
Axios 可以通过传递 cancelToken 的配置来取消请求,其原理是创建一个额外的 Promise,在发送请求前对该 Promise 的状态进行监听,如果状态被修改,则在 dispatchRequest 请求本体抛出取消信息,在 adapter 适配器中取消请求,使 promise 走向 rejected。
// https://github.com/axios/axios/blob/v1.x/lib/cancel/CancelToken.js
'use strict';

import CanceledError from './CanceledError.js';

// 通过 CancelToken 来取消请求操作
class CancelToken {
  constructor(executor) {
    if (typeof executor !== 'function') {
      throw new TypeError('executor must be a function.');
    }

    // 创建一个 Promise
    // 在调用 cancel 函数前该 promise 会一直处于 pending 状态
    let resolvePromise;
    this.promise = new Promise(function promiseExecutor(resolve) {
      resolvePromise = resolve;
    });

    const token = this;

    // eslint-disable-next-line func-names
    this.promise.then(cancel => {
      if (!token._listeners) return;

      let i = token._listeners.length;

      while (i-- > 0) {
        token._listeners[i](cancel);
      }
      token._listeners = null;
    });

    // eslint-disable-next-line func-names
    this.promise.then = onfulfilled => {
      let _resolve;
      // eslint-disable-next-line func-names
      const promise = new Promise(resolve => {
        token.subscribe(resolve);
        _resolve = resolve;
      }).then(onfulfilled);

      promise.cancel = function reject() {
        token.unsubscribe(_resolve);
      };

      return promise;
    };

    // 把控制状态的方法 cancel 传给回调函数
    // 这样外部就可以控制改变 CancelToken 的状态了
    executor(function cancel(message, config, request) {
      // 判断是否已经取消请求
      if (token.reason) {
        return;
      }

      // 创建取消请求的信息,并将信息添加到实例的 reason 属性上
      token.reason = new CanceledError(message, config, request);

      // 结束 this.promise 的 pending 状态
      // 将 this.promise 状态设置为 resolve
      resolvePromise(token.reason);
    });
  }

  // 判断该请求是否已被取消,是则抛出异常
  throwIfRequested() {
    if (this.reason) {
      throw this.reason;
    }
  }

  /**
   * Subscribe to the cancel signal
   */

  subscribe(listener) {
    if (this.reason) {
      listener(this.reason);
      return;
    }

    if (this._listeners) {
      this._listeners.push(listener);
    } else {
      this._listeners = [listener];
    }
  }

  /**
   * Unsubscribe from the cancel signal
   */

  unsubscribe(listener) {
    if (!this._listeners) {
      return;
    }
    const index = this._listeners.indexOf(listener);
    if (index !== -1) {
      this._listeners.splice(index, 1);
    }
  }

  // 提供 CancelToken 对象和控制状态的方法 cancel
  static source() {
    let cancel;
    const token = new CancelToken(function executor(c) {
      cancel = c;
    });
    return {
      token,  // 添加到请求的 config,用于标识请求
      cancel  // 调用 cancel 方法取消请求
    };
  }
}

export default CancelToken;