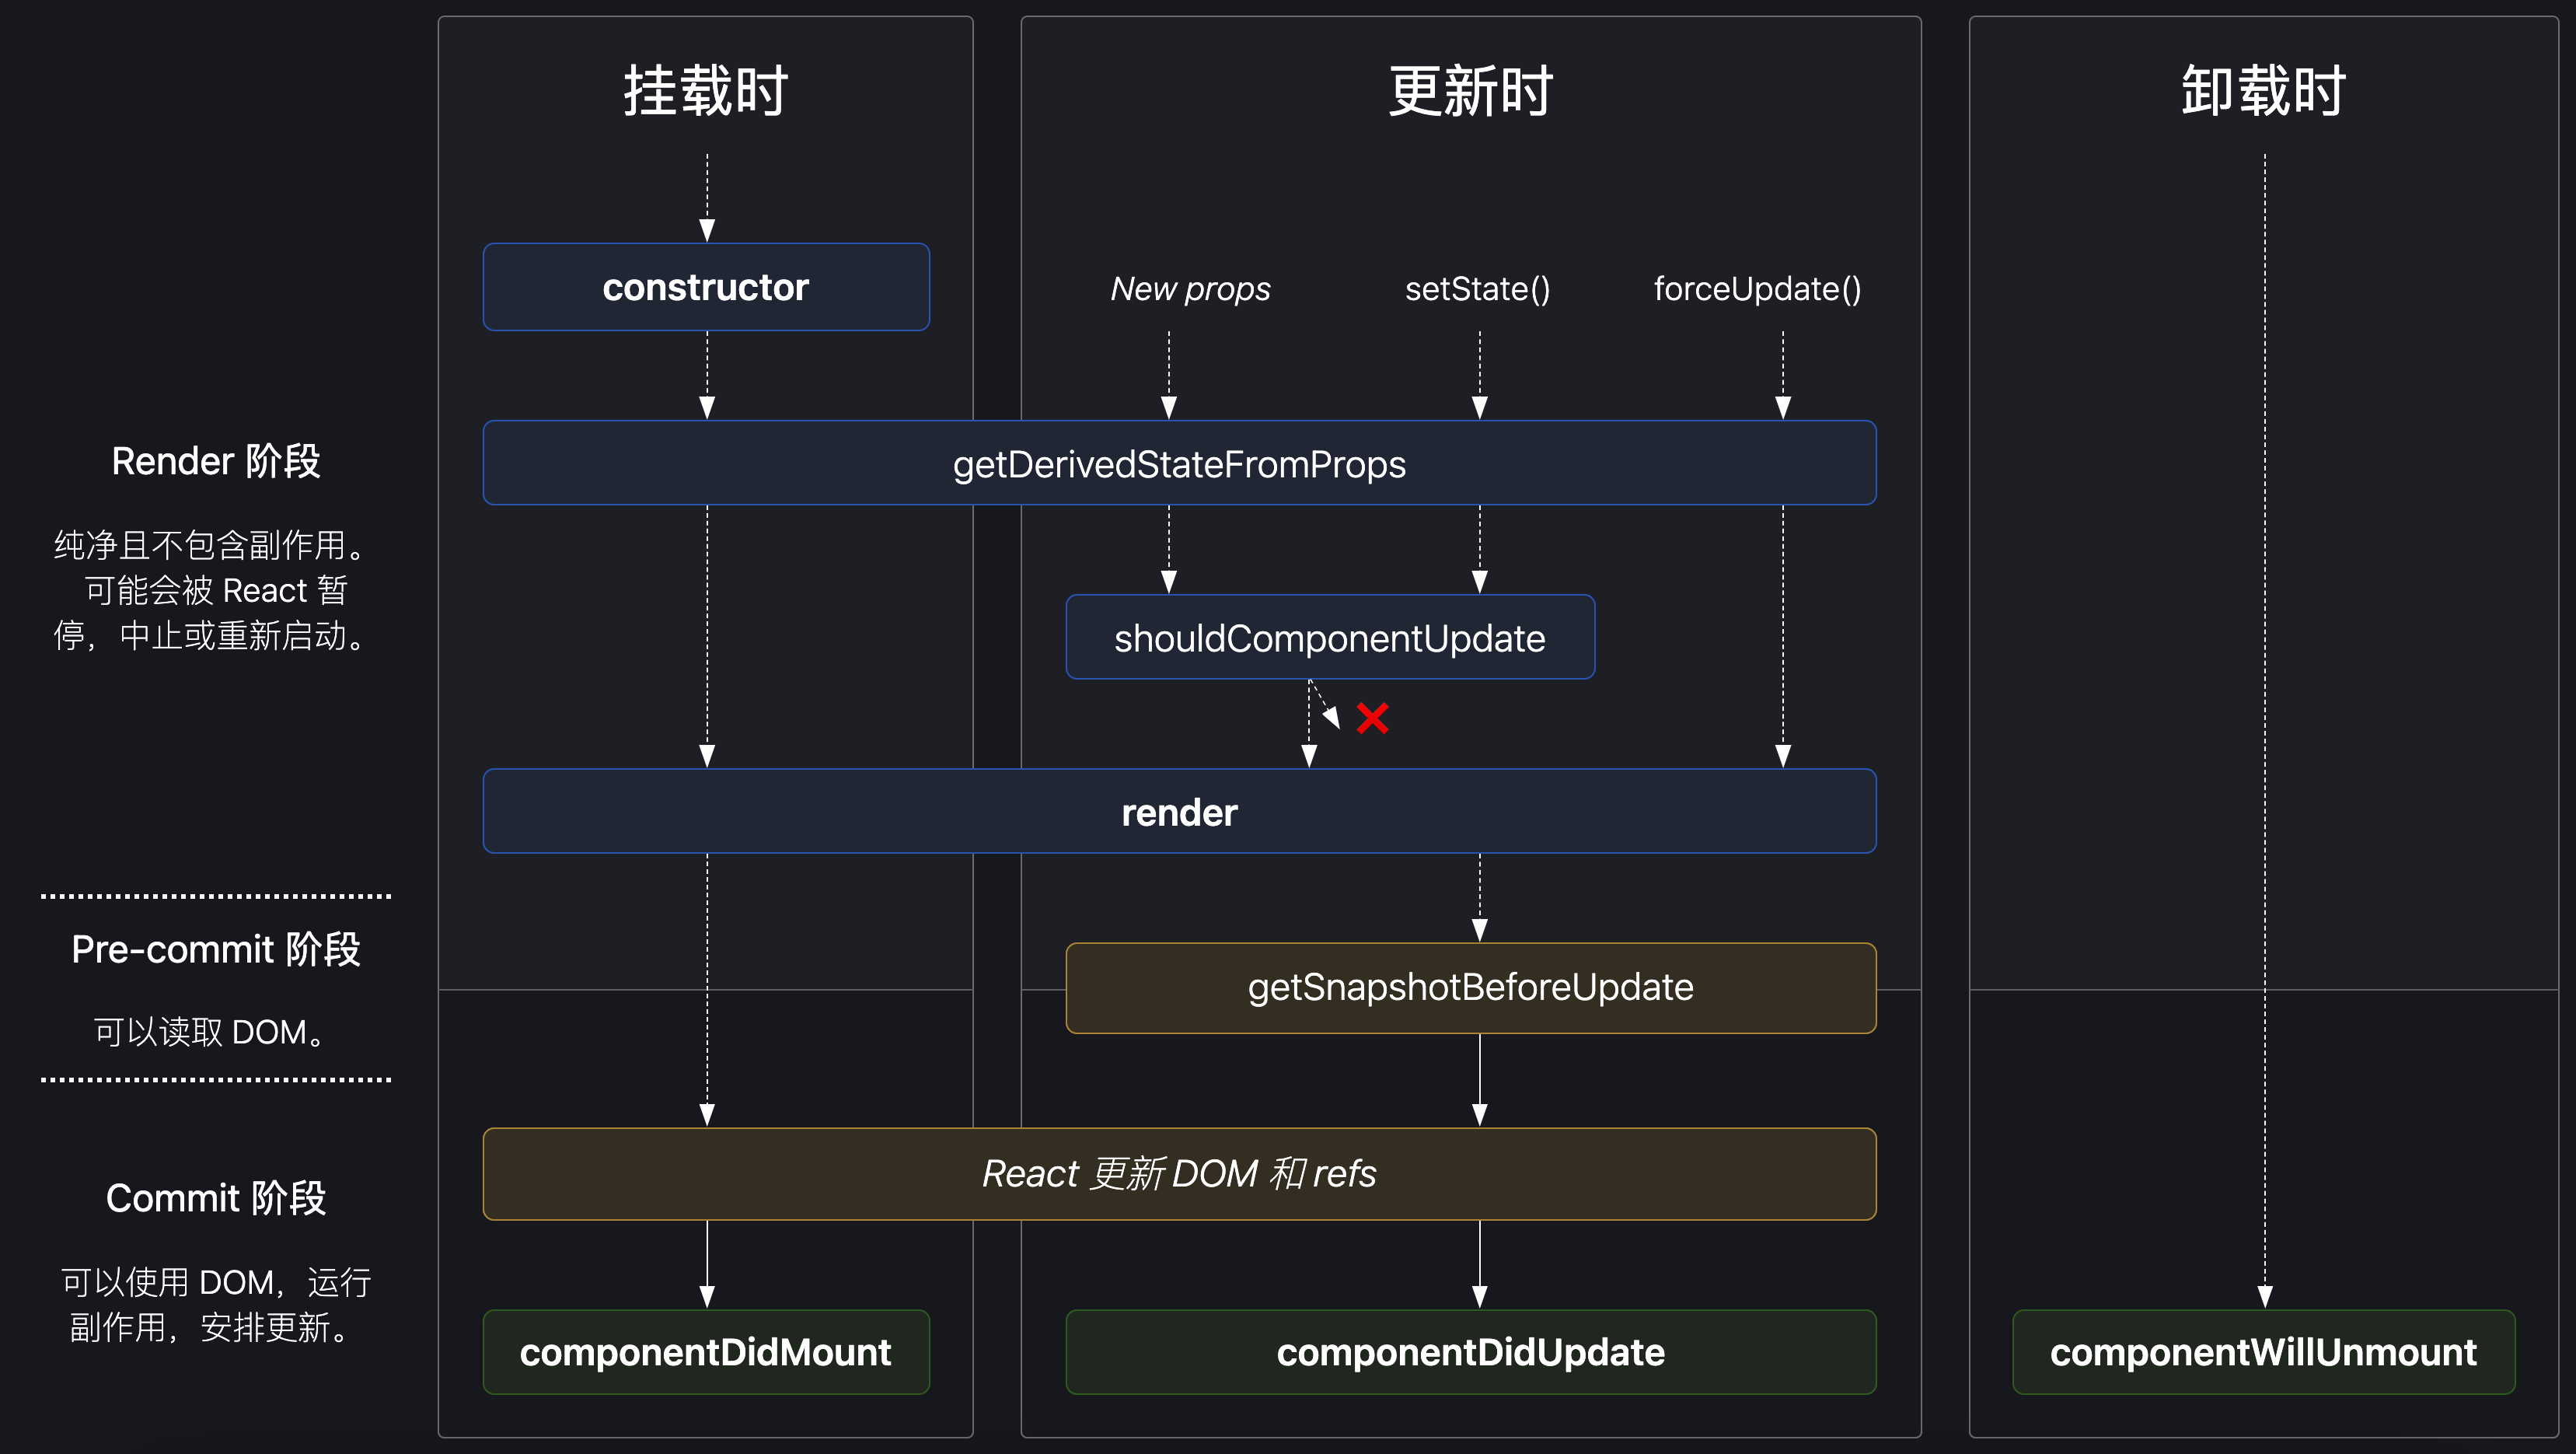
React 组件及其生命周期
组件允许你将 UI 拆分为独立可复用的代码片段,并对每个片段进行独立构思。
组件,从概念上类似于 JavaScript 函数。它接受任意的入参(即 props),并返回用于描述页面展示内容的 React 元素。
一、类组件与函数组件
1、类组件
可以使用 ES6 的 class 来定义类组件:
class Welcome extends React.Component {
  render() {
    return <h1>Hello, {this.props.name}</h1>;
  }
}
如果定义 class 组件,需要继承 React.Component
2、函数组件
可以直接编写 JavaScript 函数来定义组件:
function Welcome(props) {
  return <h1>Hello, {props.name}</h1>;
}
该函数是一个有效的 React 组件,因为它接收唯一带有数据的 props(代表属性)对象与并返回一个 React 元素。这类组件被称为函数组件,因为它本质上就是 JavaScript 函数。
3、二者的区别
- 声明语法方面:类组件需要继承 React.Component 并且创建
render函数来返回 React 元素,而函数组件是一个纯函数,它接收一个 props 对象并直接返回一个 React 元素; - 状态管理方面:类组件调用
setState来管理 state 状态,而函数组件调用useState钩子来进行管理; - 生命周期方面:类组件可以直接使用生命周期钩子函数,而函数组件使用
useEffect钩子来替代生命周期的作用; - 调用方式方面:类组件使用时 React 内部会将其实例化,然后调用实例对象的
render方法,而函数组件使用时 React 内部对其直接调用; - 状态同步方面:类组件由于 this 一直在改变,所以可以获取到最新的实时状态;而函数组件在渲染过程中因为闭包的原因捕获了渲染时的值,所以可能会出现状态更新不及时的现象,可以利用
useRef钩子来解决,ref 不仅可以用来访问 DOM 节点,也可以当作一个盒子,用来存放最新的实时状态。点击查看使用详情
二、组件的渲染
当 React 元素为用户自定义组件时,它会将 JSX 所接收的属性(attributes)以及子组件(children)转换为单个对象传递给组件,这个对象被称之为 props。
例如,下面代码在页面上渲染 “Hello, Sara”:
function Welcome(props) {
  return <h1>Hello, {props.name}</h1>;
}

const element = <Welcome name="Sara" />;

ReactDOM.render(
  element,
  document.getElementById('root')
);
上面代码做了以下事情:
- Welcome 组件将
<h1>Hello, Sara</h1>元素作为返回值。 - React 调用 Welcome 组件,并将 {name: 'Sara'} 作为 props 传入。
- 调用 ReactDOM.render() 函数,并传入
<Welcome name="Sara" />作为参数。 - React DOM 将 DOM 高效地更新为
<h1>Hello, Sara</h1>
注意:组件名称必须以大写字母开头。React 会将以小写字母开头的组件视为原生 DOM 标签。例如,<div /> 代表 HTML 的 div 标签,而 <Welcome /> 则代表一个组件,并且需在作用域内使用 Welcome。
三、组件的生命周期
每个组件都包含生命周期方法,可以重写这些方法,以便于在运行过程中特定的阶段执行这些方法。
可以使用此生命周期图谱作为速查表。在下述列表中,常用的生命周期方法会被加粗,其余生命周期函数则相对罕见。

1、挂载阶段(Mounting)
- constructor()
- getDerivedStateFromProps()
- render()
- componentDidMount()
2、更新阶段(Updating)
- getDerivedStateFromProps()
- shouldComponentUpdate()
- render()
- getSnapshotBeforeUpdate()
- componentDidUpdate()
3、卸载阶段(Unmounting)
- componentWillUnmount()
四、生命周期方法详解
1、constructor()
在 React 组件挂载之前被调用。在为 React.Component 子类实现构造函数时,应在其他语句之前调用 super(props) 来将父类的 this 对象继承给子类,否则,this.props 在构造函数中可能会出现未定义的 bug。
constructor(props)
在 React 中,构造函数仅用于以下两种情况:
- 通过给 this.state 赋值对象来初始化内部 state;
- 为事件处理函数绑定实例。
注意在 constructor() 构造函数中不能调用 this.setState() 方法,因为此时第一次 render() 还未执行,也就意味 DOM 节点还未挂载。如果组件需要使用内部 state,可直接在构造函数中为 this.state 赋值初始 state:
constructor(props) {
  super(props);
  // 不要在这里调用 this.setState()
  this.state = { counter: 0 };
  this.handleClick = this.handleClick.bind(this);
}
2、getDerivedStateFromProps()
static getDerivedStateFromProps(nextProps, prevState)
在调用 render() 方法之前调用,并且在初始挂载及后续更新时都会被调用。
参数:
nextProps:即将更新的 propsprevState:上一个状态的 state
返回值:返回一个对象来更新 state,如果返回 null 则不更新任何内容。
注意:
getDerivedStateFromProps()是一个静态函数,不能使用 this,也就是只能做一些无副作用的操作。
3、shouldComponentUpdate()
shouldComponentUpdate(nextProps, nextState)
在组件更新之前(收到新的 props 或 state 时)调用,可以控制组件是否进行更新。
参数:
nextProps:即将更新的 propsnextState:即将更新后的 state
返回值:返回 true 时组件更新,返回 false 则不更新。
注意:
- 不建议在
shouldComponentUpdate()中进行深层比较或使用 JSON.stringify(),这样非常影响性能;- 不要在
shouldComponentUpdate()中调用 setState(),会导致无限循环调用更新、渲染,直至浏览器内存崩溃。
4、render()
render() 方法是 class 组件中唯一必须实现的方法,用于渲染 dom, render() 方法必须返回 reactDOM。
注意:
render()函数应为纯函数,这意味着在不修改组件 state 的情况下,每次调用都返回相同的结果,并且它不会直接与浏览器交互,如需与浏览器进行交互,需要在componentDidMount()或其他生命周期方法中操作;- 不要在
render()中使用 setState(), 会触发死循环导致内存崩溃;- 如果
shouldComponentUpdate()返回 false,则不会调用render()。
5、getSnapshotBeforeUpdate()
在最近一次的渲染输出之前调用。也就是说,在 render() 之后,即将对组件进行挂载时调用。它可以使组件在 DOM 真正更新前捕获一些信息(例如滚动位置),此生命周期返回的任何值都会作为参数传递给 componentDidUpdate(),如不需要传递任何值,请返回 null。
示例:
class ScrollingList extends React.Component {
constructor(props) {
super(props);
this.listRef = React.createRef();
}
getSnapshotBeforeUpdate(prevProps, prevState) {
// 是否在 list 中添加新的 items
if (prevProps.list.length < this.props.list.length) {
// 捕获滚动位置以便稍后调整滚动位置
const list = this.listRef.current;
return list.scrollHeight - list.scrollTop;
}
return null;
}
componentDidUpdate(prevProps, prevState, snapshot) {
// 如果 snapshot 有值,说明刚刚添加了新的 items
// 调整滚动位置使得这些新 items 不会将旧的 items 推出视图
// 这里的 snapshot 是 getSnapshotBeforeUpdate 的返回值
if (snapshot !== null) {
const list = this.listRef.current;
list.scrollTop = list.scrollHeight - snapshot;
}
}
render() {
return (
<div ref={this.listRef}>{/* ...contents... */}</div>
);
}
}
6、componentDidMount()
在组件挂载后(插入 DOM 树中)立即调用。如需通过网络请求获取数据,此处是实例化请求的好地方。
这个方法适合添加订阅,如果添加了订阅,要记得在 componentWillUnmount() 中取消订阅。
componentDidMount() 中可以直接调用 setState(),它将触发额外渲染,但此渲染会发生在浏览器更新屏幕之前,如此保证了即使在 render() 两次调用的情况下,用户也不会看到中间状态,但该模式会导致性能问题。
7、componentDidUpdate()
componentDidUpdate(prevProps, prevState, snapshot)
在更新后会被立即调用,首次渲染不会执行。
参数:
prevProps:上一次 props 值prevState:上一次 state 值snapshot:如果组件实现了getSnapshotBeforeUpdate()生命周期,则它的返回值将传递到这个参数,否则这个参数将为 undefined。
当组件更新后,可以在此处对 DOM 进行操作,如果对更新前后的 props 进行了比较,也可以选择在此处进行网络请求。(例如,当 props 未发生变化时,则不会执行网络请求)
componentDidUpdate(prevProps) {
  // 典型用法(不要忘记比较 props):
  if (this.props.userID !== prevProps.userID) {
    this.fetchData(this.props.userID);
  }
}
注意:
- 可以在
componentDidUpdate()中直接调用 setState(),但它必须被包裹在一个条件语句中,正如上面代码那样处理,否则会导致死循环;- 请考虑直接使用 props,而不要将 props “镜像”给 state 使用。
6、componentWillUnmount()
在组件即将被卸载或销毁时进行调用,是取消网络请求、移除监听事件、清理 DOM 元素、清理定时器等操作的好时机。
注意:
componentWillUnmount()中不应调用 setState(),因为该组件将永远不会重新渲染。组件实例卸载后,将永远不会再挂载它。
五、生命周期示例
下面根据父子组件 props 改变、父组件卸载、重新挂载子组件,子组件改变自身状态 state 这几个操作步骤,对其生命周期的执行顺序进行分析:
1、组件代码
父组件:
import React, { Component } from 'react'
import { Button } from 'antd'
import Child from './child'

const parentStyle = {
  padding: 40,
  margin: 20,
  backgroundColor: 'LightCyan'
}

const NAME = 'Parent 组件:'

export default class Parent extends Component {
  constructor() {
    super()
    console.log(NAME, 'constructor')
    this.state = {
      count: 0,
      mountChild: true
    }
  }

  static getDerivedStateFromProps(nextProps, prevState) {
    console.log(NAME, 'getDerivedStateFromProps')
    return null
  }

  componentDidMount() {
    console.log(NAME, 'componentDidMount')
  }

  shouldComponentUpdate(nextProps, nextState) {
    console.log(NAME, 'shouldComponentUpdate')
    return true
  }

  getSnapshotBeforeUpdate(prevProps, prevState) {
    console.log(NAME, 'getSnapshotBeforeUpdate')
    return null
  }

  componentDidUpdate(prevProps, prevState, snapshot) {
    console.log(NAME, 'componentDidUpdate')
  }

  componentWillUnmount() {
    console.log(NAME, 'componentWillUnmount')
  }

  /**
   * 修改传给子组件属性 count 的方法
   */
  changeNum = () => {
    let { count } = this.state
    this.setState({
      count: ++count
    })
  }

  /**
   * 切换子组件挂载和卸载的方法
   */
  toggleMountChild = () => {
    const { mountChild } = this.state
    this.setState({
      mountChild: !mountChild
    })
  }

  render() {
    console.log(NAME, 'render')
    const { count, mountChild } = this.state
    return (
      <div style={parentStyle}>
        <div>
          <h3>父组件</h3>
          <Button onClick={this.changeNum}>改变传给子组件的属性 count</Button>
          <br />
          <br />
          <Button onClick={this.toggleMountChild}>卸载 / 挂载子组件</Button>
        </div>
        {mountChild ? <Child count={count} /> : null}
      </div>
    )
  }
}
子组件:
import React, { Component } from 'react'
import { Button } from 'antd'

const childStyle = {
  padding: 20,
  margin: 20,
  backgroundColor: 'LightSkyBlue'
}

const NAME = 'Child 组件:'

export default class Child extends Component {
  constructor() {
    super()
    console.log(NAME, 'constructor')
    this.state = {
      counter: 0
    }
  }

  static getDerivedStateFromProps(nextProps, prevState) {
    console.log(NAME, 'getDerivedStateFromProps')
    return null
  }

  componentDidMount() {
    console.log(NAME, 'componentDidMount')
  }

  shouldComponentUpdate(nextProps, nextState) {
    console.log(NAME, 'shouldComponentUpdate')
    return true
  }

  getSnapshotBeforeUpdate(prevProps, prevState) {
    console.log(NAME, 'getSnapshotBeforeUpdate')
    return null
  }

  componentDidUpdate(prevProps, prevState, snapshot) {
    console.log(NAME, 'componentDidUpdate')
  }

  componentWillUnmount() {
    console.log(NAME, 'componentWillUnmount')
  }

  changeCounter = () => {
    let { counter } = this.state
    this.setState({
      counter: ++counter
    })
  }

  render() {
    console.log(NAME, 'render')
    const { count } = this.props
    const { counter } = this.state
    return (
      <div style={childStyle}>
        <h3>子组件</h3>
        <p>父组件传过来的属性 count:{count}</p>
        <p>子组件自身状态 counter:{counter}</p>
        <Button onClick={this.changeCounter}>改变自身状态 counter</Button>
      </div>
    )
  }
}
2、组件初始化
父子组件第一次进行渲染加载时,控制台的打印顺序为:
- Parent 组件:constructor()
- Parent 组件:getDerivedStateFromProps()
- Parent 组件:render()
- Child 组件:constructor()
- Child 组件:getDerivedStateFromProps()
- Child 组件:render()
- Child 组件:componentDidMount()
- Parent 组件:componentDidMount()
3、子组件修改自身状态 state
点击子组件 [改变自身状态counter] 按钮,其 [自身状态counter] 值会 +1, 此时控制台的打印顺序为:
- Child 组件:getDerivedStateFromProps()
- Child 组件:shouldComponentUpdate()
- Child 组件:render()
- Child 组件:getSnapshotBeforeUpdate()
- Child 组件:componentDidUpdate()
4、修改父组件传入的 props
点击父组件中的 [改变传给子组件的属性 count] 按钮,则界面上 [父组件传过来的属性 count] 的值会 + 1,控制台的打印顺序为:
- Parent 组件:getDerivedStateFromProps()
- Parent 组件:shouldComponentUpdate()
- Parent 组件:render()
- Child 组件:getDerivedStateFromProps()
- Child 组件:shouldComponentUpdate()
- Child 组件:render()
- Child 组件:getSnapshotBeforeUpdate()
- Parent 组件:getSnapshotBeforeUpdate()
- Child 组件:componentDidUpdate()
- Parent 组件:componentDidUpdate()
5、卸载子组件
点击父组件中的 [卸载 / 挂载子组件] 按钮,则界面上子组件会消失,控制台的打印顺序为:
- Parent 组件:getDerivedStateFromProps()
- Parent 组件:shouldComponentUpdate()
- Parent 组件:render()
- Parent 组件:getSnapshotBeforeUpdate()
- Child 组件:componentWillUnmount()
- Parent 组件:componentDidUpdate()
6、重新挂载子组件
再次点击父组件中的 [卸载 / 挂载子组件] 按钮,则界面上子组件会重新渲染出来,控制台的打印顺序为:
- Parent 组件:getDerivedStateFromProps()
- Parent 组件:shouldComponentUpdate()
- Parent 组件:render()
- Child 组件:constructor()
- Child 组件:getDerivedStateFromProps()
- Child 组件:render()
- Parent 组件:getSnapshotBeforeUpdate()
- Child 组件:componentDidMount()
- Parent 组件:componentDidUpdate()
7、生命周期执行顺序总结
- 当子组件自身状态改变时,不会触发父组件的生命周期;
- 当父组件中状态发生变化(包括子组件的挂载以及卸载)时,会触发自身对应的生命周期以及子组件的更新;
- 当子组件进行卸载时,自身只会执行它
componentWillUnmount()的生命周期。