Redux 中间件及异步操作
Redux 中用户发出 Action,Reducer 函数算出新的 State,View 重新渲染。
其中,
- Action 发出以后,Reducer 立即算出 State,这叫做同步;
- Action 发出后,过一段时间再执行 Reducer,这就是异步。
要怎么才能让 Reducer 在异步操作结束后自动执行呢?这就要用到中间件(middleware)
一、Redux 中间件
1、中间件的定义
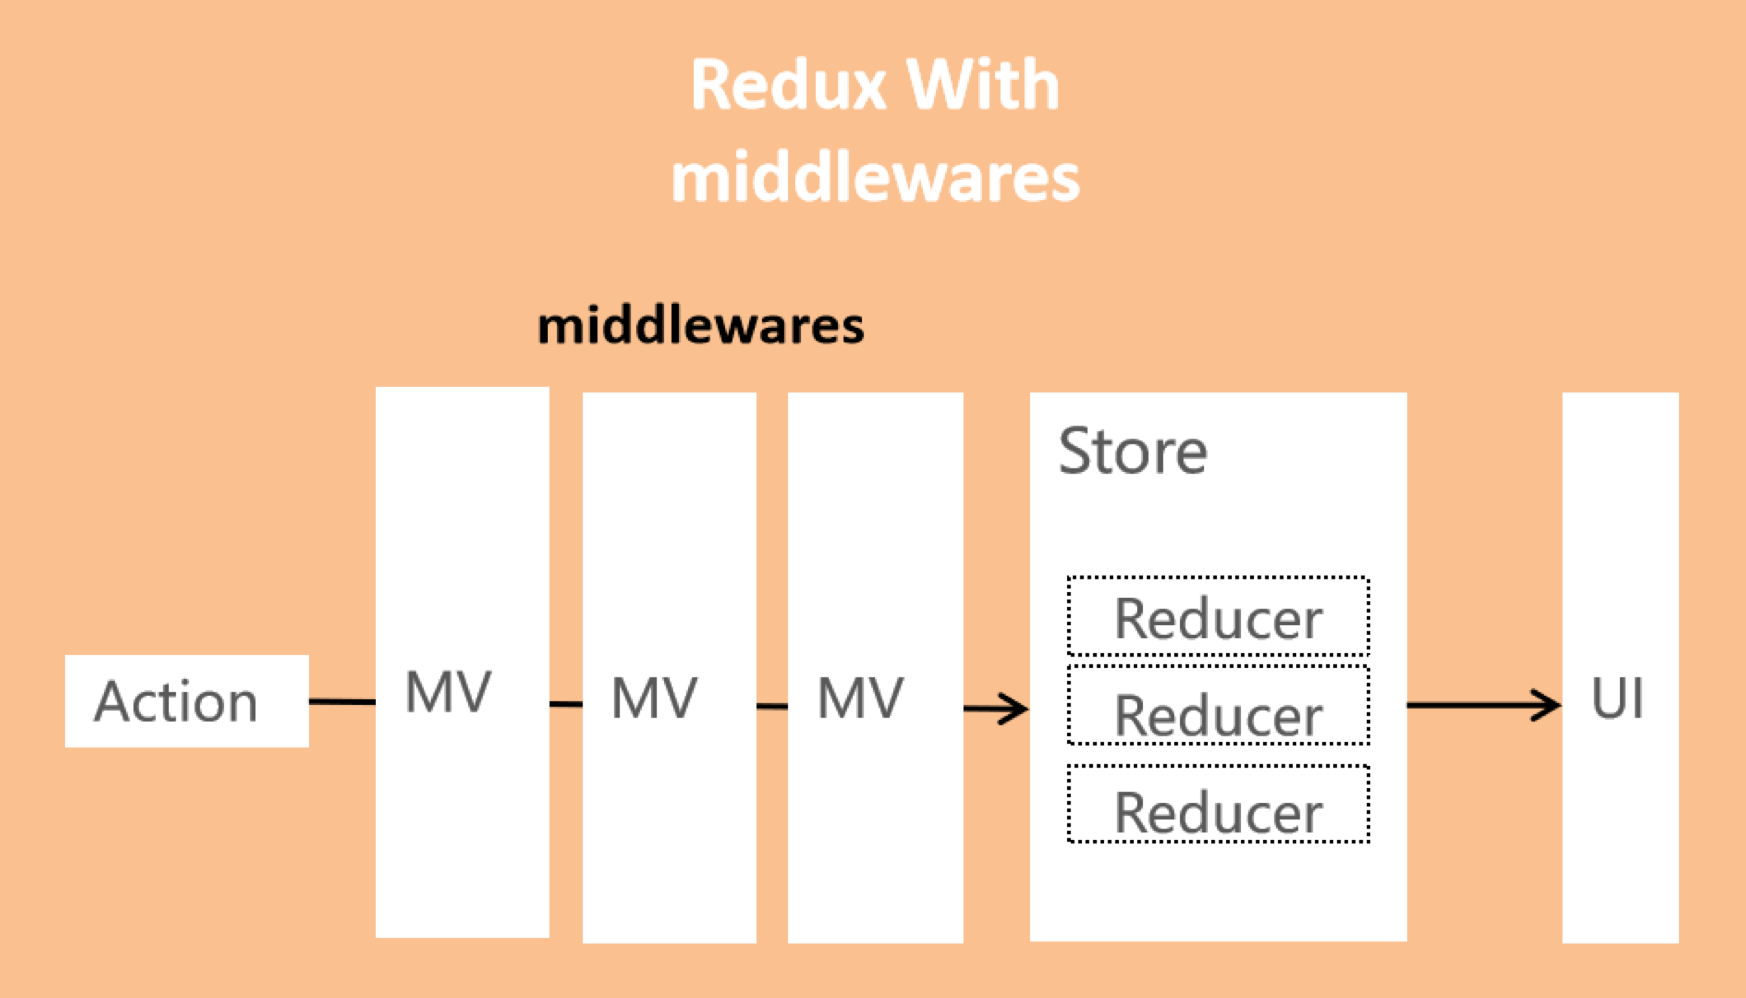
Redux 的中间件(Middleware)用于在 dispatch 分发 Action 的过程中进行拦截处理,其本质上是一个函数,对 store.dispatch 方法进行了改造,在发出 Action 和执行 Reducer 这两步之间添加其他功能。可用于支持异步操作,或支持错误处理、日志监控等。
2、中间件的用法
以生成日志中间件 logger 为例:
2-1、原生写法
可以通过 redux 提供的 applyMiddleware 方法来添加中间件:
import { applyMiddleware, createStore } from 'redux'
import createLogger from 'redux-logger'

const logger = createLogger()

const store = createStore(
  reducer,
  applyMiddleware(logger) // 可添加多个中间件 applyMiddleware(thunk, promise, logger)
)
其中,applyMiddleware 源码如下:
export default function applyMiddleware(...middlewares) {
  return (createStore) => (reducer, preloadedState, enhancer) => {
    var store = createStore(reducer, preloadedState, enhancer)
    var dispatch = store.dispatch
    var chain = []

    var middlewareAPI = {
      getState: store.getState,
      dispatch: (action) => dispatch(action)
    }
    chain = middlewares.map((middleware) => middleware(middlewareAPI))
    dispatch = compose(...chain)(store.dispatch)

    return { ...store, dispatch }
  }
}
可以看到,所有中间件被放进了一个数组 chain 中,然后嵌套执行,最后执行 store.dispatch。中间件内部(middlewareAPI)可以拿到 getState 和 dispatch 这两个方法。
2-2、Redux Toolkit 写法
Redux Toolkit 的 configureStore 用于包装 createStore。可以组合切片 reducers、添加 Redux 中间件,集成并默认开启 redux-thunk、Redux DevTools 扩展。
import { applyMiddleware, createStore } from 'redux'
import { configureStore } from '@reduxjs/toolkit'
import createLogger from 'redux-logger'

const logger = createLogger()

const store = createStore(
  reducer,
  applyMiddleware(logger)
)
const store = configureStore({
  reducer,
  middleware: [logger],
})
2-3、rematch 写法
rematch 的 init 方法也可用于添加中间件。需要加在 redux 属性下:
import { applyMiddleware, createStore } from 'redux'
import { init } from '@rematch/core'
import createLogger from 'redux-logger'

const logger = createLogger()

const store = createStore(
  reducer,
  applyMiddleware(logger)
)
const store = init({
  redux: {
    middlewares: [logger],
    reducers: {
      someReducer: (state, action) => ...,
    }
  },
})
二、Redux 异步操作
Redux 同步操作只需发出一种 Action,而异步操作需要发出三种 Action:
- 操作发起时的 Action
- 操作成功时的 Action
- 操作失败时的 Action
举个例子,实现一个查天气的系统:
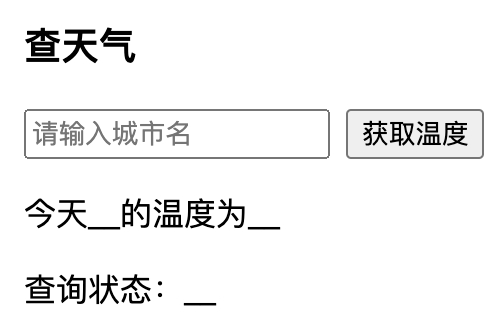
上面的查天气根据输入的城市来获取温度,同时输出查询的实时状态(正在查询〡查询成功〡查询失败)
这就需要在 dispatch.查询 Action 执行后更新查询的状态为正在查询,并在成功后设为查询成功,失败后设为查询失败,代码如下:
import React, { useState } from 'react'
import { useSelector, useDispatch } from 'react-redux'

const App = () => {
  const [curCity, setCurCity] = useState('')
  const curTemperature = useSelector((state) => state.temperature.data)
  const curStatus = useSelector((state) => state.temperature.status)

  const dispatch = useDispatch()

  const handleFetchTemperature = () => {
    dispatch.temperature.fetchingData(curCity)
  }

  return (
    <div>
      <h3>查天气</h3>
      <input
        placeholder="请输入城市名"
        type="text"
        value={curCity}
        onChange={(e) => setCurCity(e.target.value)}
      />
      <button onClick={handleFetchTemperature}>获取温度</button>
      <p>
        今天{curCity || '__'}的温度为{curTemperature || '__'}
      </p>
      <p>查询状态:{curStatus || '__'}</p>
    </div>
  )
}

export default App
这里使用 rematch 的写法来创建 store ▼
import { init } from '@rematch/core'
import temperature from './reducers/temperature'

const store = init({
  models: {
    temperature
  }
})

export default store
import * as actions from '../actions'

const defaultState = {
  data: '',
  status: '' // 正在查询 | 查询成功 | 查询失败
}

const temperature = {
  state: defaultState,
  reducers: {
    fetchingData: (state, payload) =>
      actions.handleFetchingData(state, payload),
    fetchingDataSuccess: (state, payload) =>
      actions.handleFetchingDataSuccess(state, payload),
    fetchingDataFailure: (state, payload) =>
      actions.handleFetchingDataFailure(state, payload)
  }
}

export default temperature
dispatch 触发的事件处理函数如下 ▼
import axios from 'axios'

export const handleFetchingData = (state, payload) => {
  axios
    .get(`http://wthrcdn.etouch.cn/weather_mini?city=${payload}`)
    .then((res) => {
      console.log(res.data)
      // 这里查询成功后需要去更新 state 中的状态值 ↓
      // dispatch.temperature.fetchingDataSuccess()
    })
    .catch((error) => {
      console.log(error)
      // 这里查询失败后需要去更新 state 中的状态值 ↓
      // dispatch.temperature.fetchingDataFailure()
    })
  return {
    ...state,
    status: '正在查询'
  }
}

export const handleFetchingDataSuccess = (state, payload) => {
  console.log('success', payload)
  return {
    data: payload,
    status: '查询成功'
  }
}

export const handleFetchingDataFailure = (state, payload) => {
  console.log('failure', payload)
  return {
    ...state,
    status: '查询失败'
  }
}
上面的事件处理函数中,handleFetchingData 在查询天气后需要再次调用 dispatch 来更新 state 的 status 查询状态值,并且更新查询成功后 state 的 data 温度值:
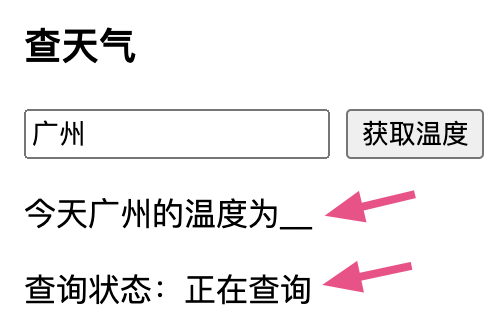
对于以上这种异步操作在得到结果后要进行 dispatch 的情况,社区中有许多优秀的异步处理中间件可以实现:
1、redux-thunk
1-1、什么是 redux-thunk
什么是 thunk
thunk 是一个延时的函数,与函数式编程中的惰性相似,编译器的"传名调用"实现,往往是将参数放到一个临时函数之中,再将这个临时函数传入函数体。这个临时函数就叫做 Thunk 函数。
redux-thunk 是 redux 官方建议的异步处理中间件,可以返回一个函数类型的 Action,接收 dispatch 参数,可以在异步回调中使用。
redux-thunk 会判断 store.dispatch 传递进来的参数,如果是一个 thunk(延时函数),就处理 thunk 里面的东西,完事之后执行这个函数。例如:
store.dispatch(dispatch => {
  dispatch({
    action: 'FETCH_START',
    text: ''
  })
  // 下面的 thunk 完成后再执行 Action FETCH_END
  fetch(...)
    .then(data) {
      dispatch({
        action: 'FETCH_END',
        text: JSON.parse(data)
      })
    }
})
上面分别设置两个 Action 来标记异步是否实现:
1-2、redux-thunk 源码
redux-thunk 的源码如下:
function createThunkMiddleware(extraArgument) {
  return ({ dispatch, getState }) =>
    (next) =>
    (action) => {
      if (typeof action === 'function') {
        return action(dispatch, getState, extraArgument)
      }

      return next(action)
    }
}

const thunk = createThunkMiddleware()
thunk.withExtraArgument = createThunkMiddleware

export default thunk
1-3、redux-thunk 的安装
# npm
npm install redux-thunk
# yarn
yarn add redux-thunk
1-4、redux-thunk 的使用
首先添加中间件 ▼
import { init } from '@rematch/core'
import temperature from './reducers/temperature'
import thunk from 'redux-thunk'

const store = init({
  models: {
    temperature
  },
  redux: {
    middlewares: [thunk]
  }
})

export default store
然后添加新的 dispatch 触发的事件处理函数 ▼
import axios from 'axios'

export const handleFetchingData = (state, payload) => {
  axios
    .get(`http://wthrcdn.etouch.cn/weather_mini?city=${payload}`)
    .then((res) => {
      console.log(res.data)
    })
    .catch((error) => {
      console.log(error)
    })
  return {
    ...state,
    status: '正在查询'
  }
}

export const handleFetchingDataSuccess = (state, payload) => {
  console.log('success', payload)
  return {
    data: payload,
    status: '查询成功'
  }
}

export const handleFetchingDataFailure = (state, payload) => {
  console.log('failure', payload)
  return {
    ...state,
    status: '查询失败'
  }
}

// 新添加的事件处理函数
export const getDataAction = (payload) => {
  return (dispatch) => {
    dispatch({ type: 'temperature/fetchingData' })
    axios
      .get(`http://wthrcdn.etouch.cn/weather_mini?city=${payload}`)
      .then((res) => {
        dispatch({
          type: 'temperature/fetchingDataSuccess',
          payload: res.data.data.wendu
        })
      })
      .catch((error) => {
        console.log(error)
        dispatch({ type: 'temperature/fetchingDataFailure' })
      })
  }
}
上面新增的事件处理函数 getDataAction 中返回了一个函数,该函数的参数是 dispatch 和 getState 这两个 Redux 方法。
该函数做了以下事情:
- 先发出一个 Action
{ type: 'temperature/fetchingData' }表示操作开始,触发该 Action 去改变查询状态为正在查询; - 然后进行异步操作:
- 如果成功则再发出一个 Action
{ type: 'temperature/fetchingDataSuccess' }并传入拿到的温度值,触发该 Action 去改变查询状态为查询成功; - 如果失败则再发出一个 Action
{ type: 'temperature/fetchingDataFailure' },触发该 Action 去改变查询状态为查询失败。
- 如果成功则再发出一个 Action
最后引入新的 dispatch 触发的事件处理函数 ▼
import React, { useState } from 'react'
import { useSelector, useDispatch } from 'react-redux'
import { getDataAction } from './store/actions'

const App = () => {
  const [curCity, setCurCity] = useState('')
  const curTemperature = useSelector((state) => state.temperature.data)
  const curStatus = useSelector((state) => state.temperature.status)

  const dispatch = useDispatch()

  const handleFetchTemperature = () => {
    dispatch.temperature.fetchingData(curCity)
    dispatch(getDataAction(curCity))
  }

  return (
    <div>
      <h3>查天气</h3>
      <input
        placeholder="请输入城市名"
        type="text"
        value={curCity}
        onChange={(e) => setCurCity(e.target.value)}
      />
      <button onClick={handleFetchTemperature}>获取温度</button>
      <p>
        今天{curCity || '__'}的温度为{curTemperature || '__'}
      </p>
      <p>查询状态:{curStatus || '__'}</p>
    </div>
  )
}

export default App
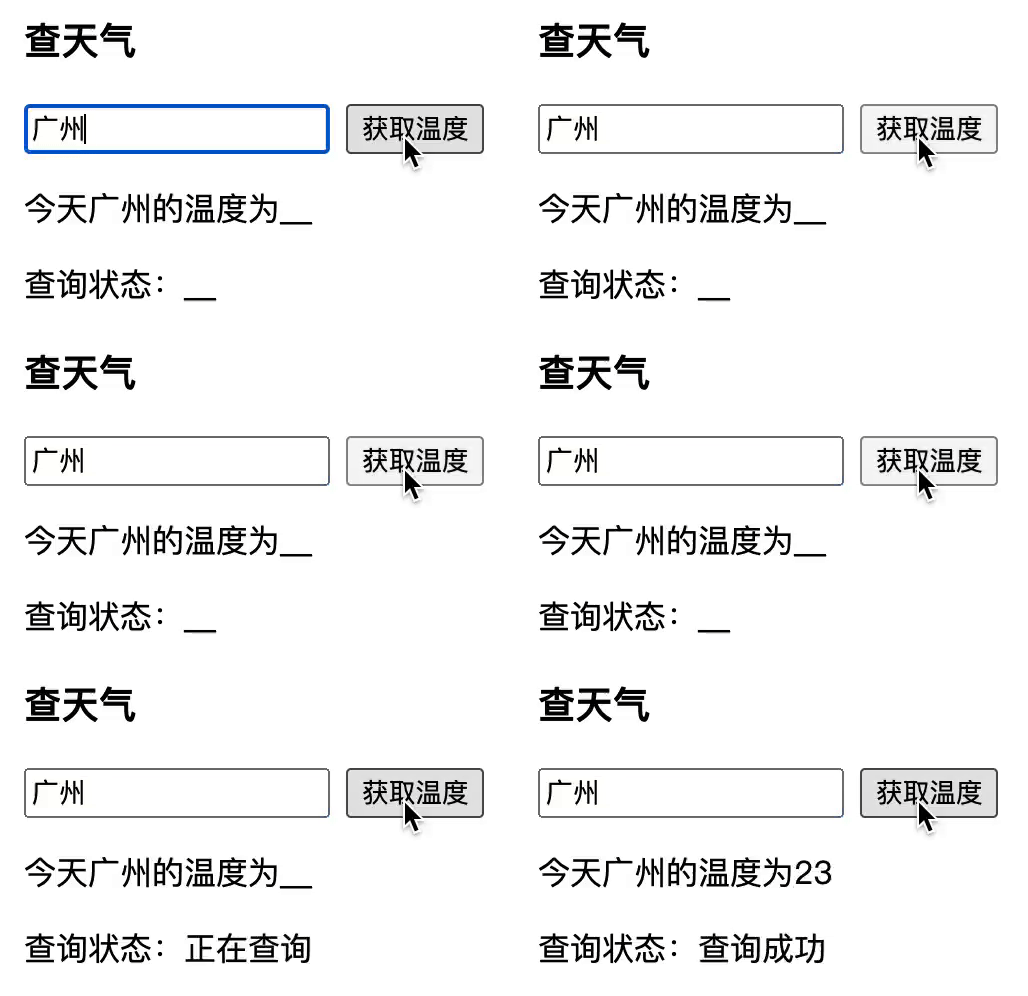
实现效果如下:
2、redux-saga
2-1、什么是 redux-saga
什么是 saga
一个 saga 可以看作是应用程序中一个单独的线程,它独自负责处理副作用(异步获取数据、访问浏览器缓存等)
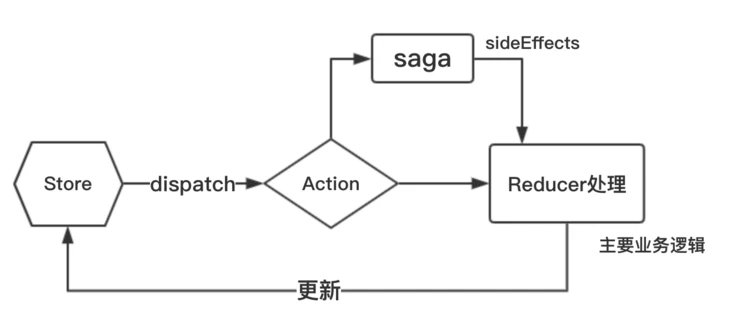
redux-saga 是一个 redux 中间件,使用了 ES6 Generator,通过创建 sagas 将所有的异步操作逻辑放在一个地方集中处理,可以无侵入的处理副作用(例如异步操作),具体过程是对 Action 进行拦截,然后在单独的 sagas 文件中对异步操作进行处理,最后返回一个新的 Action 传给 Reducer,再去更新 store。
2-2、watcher / worker saga
redux-saga 需要一个全局监听器 watcher saga,用于监听组件发出的 Action,将监听到的 Action 转发给对应的接收器 worker saga,再由接收器执行具体任务,副作用执行完后,再发出另一个 Action 交由 reducer 修改 state,因此 watcher saga 监听的 Action 与对应 worker saga 中发出的 Action 不能同名,否则会造成死循环。
watcher saga
import { takeEvery } from 'redux-saga/effects'

// watcher saga
function* watchIncrementSaga() {
  yield takeEvery('increment', workIncrementSaga)
}
watcher saga 用于监听用户派发的 Action(只用于监听,具体操作交由 worker saga),这里使用 takeEvery 辅助方法,表示每次派发都会被监听到,第一个参数就是用户派发 Action 的类型,第二个参数就是指定交由哪个 worker saga 进行处理。
worker saga
因此需要再定义一个名为 workIncrementSaga 的 worker saga,在里面执行副作用操作,然后使用 yield put(...) 派发 action,让 reducer 去更新 state:
import { call, put, takeEvery } from 'redux-saga/effects'

// watcher saga
function* watchIncrementSaga() {
  yield takeEvery('increment', workIncrementSaga)
}

// worker saga
function* workIncrementSaga() {
  function f() {
    return fetch('https://jsonplaceholder.typicode.com/posts')
      .then((res) => res.json())
      .then((data) => data)
  }
  const res = yield call(f)
  console.log(res)
  yield put({ type: 'INCREMENT' })
}
2-3、监听辅助函数 API
takeEvery
监听类型,同一时间允许多个处理函数同时进行,并发处理。
举个例子:这里在每次点击 “1秒后加1” 按钮时,发起一个 incrementAsync 的 action。
首先创建一个将执行异步 action 的任务:
import { delay, put } from 'redux-saga/effects'

function* incrementAsync() {
  // 延迟 1s
  yield delay(1000)

  yield put({
    type: 'increment'
  })
}
然后在每次 incrementAsync action 被发起时启动上面的任务:
import { takeEvery } from 'redux-saga'

function* watchIncrementAsync() {
  yield takeEvery('incrementAsync', incrementAsync)
}
takeLatest
监听类型,同一时间只能有一个处理函数在执行,后面开启的任务会执行,前面的会取消执行。
上面的例子中,takeEvery 是每次发起 incrementAsync action 时都会执行。如果只想得到最新请求的响应,可以使用 takeLatest 辅助函数:
import { takeLatest } from 'redux-saga'

function* watchIncrementAsync() {
  yield takeLatest('incrementAsync', incrementAsync)
}
takeLeading
如果当前有一个处理函数正在执行,那么后面开启的任务都不会被执行,直到该任务执行完毕。
2-4、常见的声明式 Effect
什么是 Effect
在 redux-saga 中,sagas 都用 Generator 函数实现(Generator 函数中 yield 右边的表达式会被求值),这里 yield 纯 JavaScript 对象以表达 Saga 逻辑,这些对象称为 Effect。
Effect 对象包含了一些给 middleware 解释执行的信息,可以把 Effect 看作是发送给 middleware 的指令以执行某些操作(调用异步函数、发起一个 action 到 store 等),可以使用 redux-saga/effects 包提供的函数来创建 Effect。
take(pattern)
take 函数可以理解为监听未来的 action,它创建了一个命令对象,告诉 middleware 等待一个特定的 action,直到一个与 pattern 匹配的 action 被发起,才会继续执行下面的语句。举个例子:
function* watchDecrementSaga() {
  while (true) {
    yield take('decrement')
    const state = yield select()
    console.log(state, 'state')
    yield put({ type: 'DECREMENT' })
  }
}
此时用户派发一个 { type: 'decrement', payload } 的 action,就会被上面的 take 拦截到,执行相应的代码,然后再去派发一个 action,通知 reducer 修改 state,如果没有 put,则不会通知 reducer 修改 state,注意需要使用 while true 一直监听,否则只有第一次派发 decrement 的 action 会被拦截,后面的都不会被拦截到。
其中,pattern 的匹配有以下几种形式:
- 如果是空参数或
*将匹配所有发起的 action(例如,take()将匹配所有 action) - 如果是个函数,将匹配返回 true 的 action(例如,
take(action => action.entities)将匹配哪些 entities 字段为真的 action) - 如果是个字符串,将匹配
action.type === pattern的 action(例如,take(INCREMENT_ASYNC))
take 可看作是上面几种辅助函数的底层实现 ▼
put(action)
put 函数是用来发送 action 的 effect,可以理解为 Redux 中的 dispatch 函数,当 put 一个 action 后,reducer 会计算新的 state 并返回。
function* incrementAsync() {
  // 延迟1s
  yield delay(1000)

  yield put({
    type: 'increment'
  })
}
call(fn, ...args)
call 用于调用其他函数,创建一个 Effect 描述信息,用来命令 middleware 以参数 args 调用函数 fn。
fn: 一个 Generator 函数, 或返回 Promise 的普通函数;args: 传递给 fn 的参数数组。
fork(fn, ...args)
fork 与 call 用法一样,用于调用其他函数,唯一的区别就是 fork 是非阻塞的(执行完 yield fork(fn, args) 后会立即执行下一行代码),而 call 是阻塞的。
fn: 一个 Generator 函数, 或返回 Promise 的普通函数;args: 传递给 fn 的参数数组。
select(selector, ...args)
select 用于返回 selector(getState(), ...args) 的结果,第一个参数是个函数,其参数是 state(当前状态),后面的参数依次传递给第一个函数,作为该函数的参数。
function selector(state, index) {
  return state[index]
}

let state2 = yield select(selector, 0)
console.log(state2, 'select2')
select 可以不传任何参数,返回值就直接是当前的所有状态。
2-5、redux-saga 的安装
# npm
npm install redux-saga
# yarn
yarn add redux-saga
2-6、redux-saga 的使用
下面使用 redux-saga 替代 redux-thunk 改造上面的查询天气工具,在异步操作后执行 dispatch:

首先新增 sagas 文件处理异步逻辑 ▼
import { put, takeEvery, call } from 'redux-saga/effects'
import axios from 'axios'

const getData = (action) => {
  return axios
    .get(`http://wthrcdn.etouch.cn/weather_mini?city=${action.payload}`)
    .then((res) => {
      return res.data.data.wendu
    })
    .catch((error) => {
      console.log(error)
      return
    })
}

function* incrementAsync(payload) {
  // yield call 是阻塞的,会等里面的函数执行完再执行下一行代码
  const curTemperature = yield call(getData, payload)
  // 执行完上面的 yield call 拿到数据后,使用 put 执行新 Action
  yield put({
    type: 'temperature/fetchingDataSuccess',
    payload: curTemperature
  })
}

export default function* rootSaga() {
  // 监听 Action - temperature/fetchingData,触发上面的 incrementAsync
  yield takeEvery('temperature/fetchingData', incrementAsync)
}
然后添加中间件并引入写好的 sagas 文件 ▼
import { init } from '@rematch/core'
import counter from './reducers/counter'
import temperature from './reducers/temperature'
import createSagaMiddleware from 'redux-saga'
import rootSaga from './sagas'

const sagaMiddleware = createSagaMiddleware()

const store = init({
  models: {
    counter,
    temperature
  },
  redux: {
    middlewares: [sagaMiddleware]
  }
})

sagaMiddleware.run(rootSaga)

export default store
修改 dispatch 触发的事件处理函数 ▼
import axios from 'axios'

export const handleFetchingData = (state, payload) => {
  axios
    .get(`http://wthrcdn.etouch.cn/weather_mini?city=${payload}`)
    .then((res) => {
      console.log(res.data)
    })
    .catch((error) => {
      console.log(error)
    })
  return {
    ...state,
    status: '正在查询'
  }
}

export const handleFetchingDataSuccess = (state, payload) => {
  console.log('success', payload)
  return {
    data: payload,
    status: '查询成功'
  }
}

export const handleFetchingDataFailure = (state, payload) => {
  console.log('failure', payload)
  return {
    ...state,
    status: '查询失败'
  }
}
到这里,查询天气工具就改造完了。